
Annapurna Circuit Trek Packing List 2026: Complete Gear Guide

Annapurna Circuit Trek

Planning the Annapurna Circuit Trek in 2026? One of the most important things to prepare before arriving in Nepal is your trekking gear.

The Annapurna Circuit is different from many shorter Himalayan treks because the trail passes through several distinct environments. You may begin the journey in a relatively warm valley and gradually climb toward high-altitude landscapes, eventually reaching Thorong La Pass at 5,416 metres (17,769 feet).

That means your backpack needs to be prepared for changing temperatures, strong mountain winds, rain, cold mornings and potentially snow around the highest sections of the trail.

At Ambition Himalaya, we recommend packing smart rather than simply packing more. The goal is to carry everything you genuinely need while keeping your backpack manageable throughout the trek.

This Annapurna Circuit Trek Packing List 2026 explains what to bring, what you can rent in Nepal, what you should keep in your daypack, and which items you can safely leave behind.

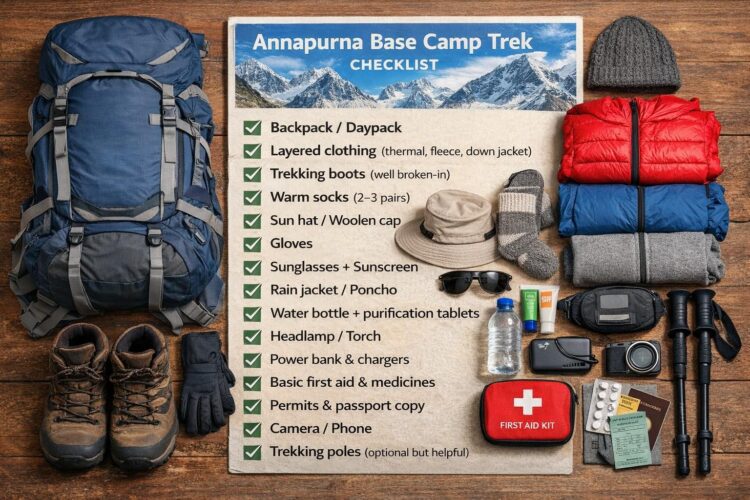
Annapurna Circuit Trek Packing List at a GlanceAnnapurna Circuit Trek Packing List at a Glance

Before going into every category, here is a quick checklist of the essential equipment.

Clothing

  • Moisture-wicking trekking T-shirts
  • Thermal base layers
  • Trekking trousers
  • Fleece jacket
  • Insulated/down jacket
  • Waterproof and windproof jacket
  • Waterproof trekking trousers
  • Warm hat
  • Sun hat or cap
  • Buff or neck gaiter
  • Trekking socks
  • Warm gloves
  • Underwear

Footwear

  • Comfortable trekking boots
  • Camp shoes or sandals
  • Trekking socks
  • Gaiters if travelling during snowy conditions

Trekking Gear

  • 25–40 litre daypack
  • Duffel bag if using a porter
  • Rain cover
  • Trekking poles
  • Headlamp
  • Water bottles or hydration system
  • Sleeping bag
  • Sleeping bag liner

Personal Essentials

  • Passport
  • Trekking permits and documents
  • Travel insurance details
  • Cash in Nepalese Rupees
  • Sunglasses
  • Sunscreen
  • Lip balm with SPF
  • Personal toiletries
  • Small towel

Health & Safety

  • Personal medication
  • Basic first-aid kit
  • Blister treatment
  • Oral rehydration salts
  • Water purification tablets/filter
  • Personal altitude medication prescribed by your doctor

Electronics

  • Smartphone
  • Camera
  • Power bank
  • Charging cables
  • Universal travel adapter
  • Spare batteries where required

Annapurna Circuit Trek Packing List at a Glance

Why Packing Correctly Matters on the Annapurna Circuit

The Annapurna Circuit covers a dramatic range of elevations and landscapes. Lower sections can feel warm during the day, while the higher areas around Thorong La can become extremely cold, especially during early-morning crossings.

This is why a simple “summer clothes + one jacket” approach is not suitable.

The most useful strategy is layering.

Instead of carrying one extremely heavy jacket for every situation, use several layers that can be added or removed according to the temperature.

A practical layering system consists of:

Base layer → fleece/insulation → down jacket → waterproof/windproof outer shell

This gives you flexibility without unnecessarily increasing your pack weight.

1. Base Layers and Trekking Shirts

Your base layer sits directly against your skin and should move moisture away from your body.

Pack:

  • 2–3 quick-drying T-shirts
  • 1–2 thermal long-sleeve tops
  • 1–2 thermal bottoms
  • 4–5 pairs of trekking underwear

Merino wool or good-quality synthetic fabrics are preferable because they dry faster and manage moisture better than cotton.

Avoid Cotton

Cotton absorbs moisture and takes longer to dry.

On a Himalayan trek, wet clothing can become uncomfortable and cold very quickly.

For that reason, lightweight synthetic or merino clothing is generally more practical.

2. Trekking Trousers and Lower-Body Clothing

A pair of comfortable trekking trousers is one of the most frequently used items on the trail.

We recommend:

  • 2 pairs of trekking trousers
  • 1 lightweight pair of thermal bottoms
  • 1 optional lightweight short
  • Waterproof trekking trousers

Convertible trekking trousers can be useful in warmer lower sections.

As you gain elevation, however, long trousers and thermal layers become increasingly useful.

3. Fleece Jacket or Mid-Layer

A fleece jacket provides an important insulation layer without adding excessive weight.

A lightweight or medium-weight fleece is usually enough for everyday trekking conditions.

It can be worn:

  • During cool mornings
  • In shaded sections
  • Around higher villages
  • Inside teahouses during cold evenings

The advantage of fleece is that it works well as part of a layering system.

4. Down or Insulated Jacket

A proper insulated jacket is one of the most important pieces of equipment for the high sections of the Annapurna Circuit.

Temperatures can fall significantly around high camps and during early-morning sections of the Thorong La crossing.

Choose a jacket that:

  • Provides sufficient insulation
  • Packs reasonably small
  • Fits comfortably over your base and fleece layers
  • Protects you from cold mountain conditions

If you do not own a suitable down jacket, renting one in Kathmandu or Pokhara can be a practical option.

5. Waterproof and Windproof Jacket

Do not rely only on your down jacket for weather protection.

A lightweight waterproof shell provides protection against:

  • Rain
  • Snow
  • Strong wind
  • Sudden weather changes

Your outer shell should fit comfortably over your insulation layers.

A waterproof jacket is particularly useful because weather conditions in the mountains can change quickly.

6. Trekking Boots

Your trekking boots are arguably one of the most important items you will bring.

Choose boots that:

  • Are comfortable
  • Have good grip
  • Provide suitable ankle support
  • Are already broken in
  • Fit correctly with your trekking socks

Never Start the Trek With Brand-New Boots

Breaking in your boots before the trek can significantly reduce the possibility of painful hot spots and blisters.

Your boots should be comfortable before you arrive in Nepal.

7. Trekking Socks

Bring around 4–5 pairs of good-quality trekking socks.

Merino wool or technical synthetic socks are useful because they provide warmth while managing moisture.

Avoid wearing wet socks for long periods.

A simple habit that helps is keeping one dry pair specifically for evenings at the teahouse.

8. Trekking Poles

Trekking poles are optional, but many trekkers find them extremely useful on the Annapurna Circuit.

They can help with:

  • Long ascents
  • Uneven trails
  • Rocky sections
  • Descents
  • Reducing stress on knees

They become particularly useful during long downhill sections after crossing Thorong La.

If you are not travelling with poles, they can generally be purchased or rented in Nepal.

9. Backpack and Duffel Bag

If you are using a porter, you normally do not need to carry your entire trekking wardrobe on your back.

A practical setup is:

Your Daypack

Approximately 25–40 litres, depending on how much you prefer to carry yourself.

Keep essential items accessible:

  • Water
  • Snacks
  • Waterproof jacket
  • Down jacket
  • Gloves
  • Hat
  • Sunglasses
  • Sunscreen
  • Camera
  • Documents
  • Medication
  • Power bank

Porter Duffel

Your main clothing and less frequently used equipment can go into a soft duffel bag.

Always keep important documents, valuables, electronics and essential medication with you rather than inside your porter bag.

10. Sleeping Bag

A warm sleeping bag can make a major difference to your comfort during the colder nights.

For the Annapurna Circuit, especially when travelling through the colder months or crossing the higher sections, choose a sleeping bag appropriate for the expected temperatures.

If you do not want to purchase one specifically for a single trek, sleeping bags are available for rent in Kathmandu and Pokhara.

The exact warmth required depends on your travel season, route variation and accommodation conditions.

11. Headlamp

A lightweight headlamp is an essential item.

It is useful for:

  • Early morning starts
  • Walking around the teahouse after dark
  • Power cuts
  • Preparing for a pre-dawn high-pass crossing

Bring spare batteries or make sure the rechargeable headlamp is fully charged before the trek.

12. Sunglasses and Sun Protection

High-altitude sunlight can be intense.

Your packing list should include:

  • UV-protection sunglasses
  • Sunscreen, preferably SPF 30–50+
  • SPF lip balm
  • Sun hat or cap
  • Buff or neck protection

Sunglasses become particularly important around exposed high-altitude terrain and snow because reflected sunlight can be uncomfortable and potentially harmful to your eyes.

13. Water and Hydration

Staying hydrated is important throughout the trek.

Carry:

  • Reusable water bottles
  • Water purification tablets or a suitable filter
  • Optional hydration bladder

A total carrying capacity of around 2 litres or more can be useful depending on the day’s route and water availability.

Avoid depending entirely on buying bottled water every day.

A reusable system is more convenient and helps reduce plastic waste along the trail.

14. Personal First-Aid Kit

You do not need to carry a large medical bag.

A compact personal kit can include:

  • Blister treatment
  • Adhesive bandages
  • Antiseptic wipes
  • Gauze
  • Pain-relief medication that you normally use
  • Oral rehydration salts
  • Personal prescription medicines
  • Any medication specifically prescribed for altitude by your doctor

If you have an existing medical condition or take prescription medication, speak with your doctor before travelling.

Altitude Awareness

The Annapurna Circuit reaches a significant altitude, particularly around Thorong La.

Knowing the symptoms of altitude sickness is more important than simply carrying medication.

If you develop concerning symptoms at altitude, tell your guide immediately and follow professional medical advice.

15. Toiletries and Personal Hygiene

Keep your toiletries lightweight.

Useful items include:

  • Toothbrush and toothpaste
  • Biodegradable soap
  • Small shampoo
  • Hand sanitizer
  • Wet wipes
  • Small quick-drying towel
  • Toilet paper or tissues
  • Moisturizer
  • Sunscreen
  • Lip balm

A small toiletry bag is enough.

There is no reason to carry full-size bottles of everything.

16. Electronics and Charging

Bring only the electronics you genuinely need.

Recommended:

  • Smartphone
  • Camera
  • Charging cable
  • Power bank
  • Universal adapter
  • Spare camera batteries

A 10,000–20,000 mAh power bank can be useful during a longer trek, particularly when charging availability becomes limited or inconvenient.

Keep electronic equipment protected from moisture.

17. Documents and Money

Keep your important documents safely accessible.

Carry:

  • Passport
  • Copies of important documents
  • Trekking permit information
  • Travel insurance documents
  • Emergency contact information
  • Nepalese cash

Do not keep all of your cash in a single location.

Your travel insurance should specifically cover trekking at the altitude relevant to your itinerary.

18. Snacks for the Trail

You can buy food along much of the Annapurna Circuit, but carrying a few personal snacks is useful.

Good options include:

  • Energy bars
  • Nuts
  • Chocolate
  • Dried fruit
  • Electrolyte sachets

Choose compact, high-energy foods that you actually enjoy eating.

19. What to Pack for Thorong La Pass

The Thorong La Pass at 5,416 metres is one of the most demanding parts of the Annapurna Circuit.

For the pass day, keep your warmest and most important equipment immediately accessible.

Your daypack should include:

  • Insulated/down jacket
  • Warm gloves
  • Warm hat
  • Thermal layer
  • Waterproof/windproof shell
  • Headlamp
  • Sunglasses
  • Water
  • Snacks
  • Personal medication
  • Sunscreen
  • Phone/camera
  • Power bank

Do not bury essential cold-weather equipment inside the main porter duffel.

20. What to Pack by Season

Spring: March to May

Spring generally brings a combination of cool mornings, warmer daytime temperatures and changing conditions at higher elevations.

Pack:

  • Lightweight layers
  • Fleece
  • Insulated jacket
  • Rain protection
  • Sun protection
  • Warm sleeping bag

Higher sections can still be very cold, so do not pack only for the lower valley.

Monsoon: June to August

The monsoon period requires additional rain protection.

Consider:

  • Waterproof jacket
  • Waterproof trousers
  • Backpack rain cover
  • Dry bags
  • Quick-drying clothing
  • Extra socks
  • Waterproof protection for electronics

Trail and weather conditions can vary considerably during this period.

Check current local conditions before departure.

Autumn: September to November

Autumn is a popular period for trekking in Nepal.

You should still prepare for cold conditions at higher elevations.

Pack:

  • Base layers
  • Fleece
  • Down/insulated jacket
  • Waterproof shell
  • Warm gloves
  • Hat
  • Sleeping bag
  • Strong sun protection

Clear weather does not mean the high-altitude sections will be warm.

Winter: December to February

Winter requires greater attention to cold-weather equipment.

Consider:

  • Warmer sleeping bag
  • Good insulated jacket
  • Thermal base layers
  • Warm gloves
  • Warm hat
  • Gaiters
  • Appropriate footwear
  • Additional cold-weather layers

Snow and trail conditions can vary, so always check current conditions with your trekking agency and guide before attempting a high-pass crossing.

What NOT to Pack for the Annapurna Circuit

Overpacking is one of the most common mistakes on a long Himalayan trek.

You can usually leave these items behind:

  • Heavy jeans
  • Too many T-shirts
  • Large bottles of shampoo
  • Excessive cosmetics
  • Multiple pairs of casual shoes
  • Expensive jewellery
  • Unnecessary electronics
  • Heavy books
  • Large towels
  • Duplicate jackets
  • Clothing you are unlikely to wear

Remember:

Every unnecessary kilogram becomes part of your journey.

Pack fewer items, but make sure the important ones are reliable.

What Can You Rent in Kathmandu or Pokhara?

You do not necessarily need to purchase every piece of trekking equipment before arriving in Nepal.

Depending on availability, commonly rented equipment can include:

  • Down jackets
  • Sleeping bags
  • Trekking poles
  • Duffel bags
  • Some trekking accessories

Renting can be particularly useful if you only trek occasionally and do not want to purchase bulky cold-weather equipment.

At Ambition Himalaya, we can also advise you about the equipment required for your specific itinerary and season before your trek begins.

A Practical Annapurna Circuit Packing Checklist

Clothing

☐ 2–3 trekking T-shirts
☐ 1–2 thermal tops
☐ 1–2 thermal bottoms
☐ 2 trekking trousers
☐ Fleece jacket
☐ Down/insulated jacket
☐ Waterproof jacket
☐ Waterproof trousers
☐ 4–5 pairs trekking socks
☐ Warm hat
☐ Sun hat
☐ Gloves
☐ Buff
☐ Underwear

Footwear

☐ Broken-in trekking boots
☐ Camp shoes/sandals
☐ Gaiters if required

Trekking Equipment

☐ Daypack
☐ Duffel bag
☐ Backpack rain cover
☐ Trekking poles
☐ Headlamp
☐ Sleeping bag
☐ Water bottles
☐ Water purification system

Health

☐ Personal medication
☐ First-aid kit
☐ Blister treatment
☐ ORS/electrolytes
☐ Sunscreen
☐ SPF lip balm

Electronics

☐ Smartphone
☐ Camera
☐ Power bank
☐ Charging cables
☐ Travel adapter
☐ Spare batteries

Documents

☐ Passport
☐ Permit documents
☐ Travel insurance
☐ Emergency contacts
☐ Nepalese cash

Frequently Asked Questions

How much should I pack for the Annapurna Circuit Trek?

Try to keep your equipment practical and lightweight. If you use a porter, keep the main bag manageable and carry only essential daily items in your daypack.

The exact weight depends on your personal needs, season and whether you use a porter.

Do I need a sleeping bag for the Annapurna Circuit?

A sleeping bag is strongly recommended, particularly for colder seasons and higher elevations. You can also consider renting one in Kathmandu or Pokhara.

Do I need a down jacket for Thorong La?

A warm insulated jacket is an important part of your high-altitude clothing system. The correct warmth level depends on the season and current conditions.

Can I rent trekking equipment in Nepal?

Yes. Kathmandu and Pokhara have trekking shops where travellers can commonly rent items such as sleeping bags, down jackets, trekking poles and duffel bags.

What shoes should I wear for the Annapurna Circuit?

Use comfortable, properly broken-in trekking boots with good grip. Avoid starting a long trek with brand-new footwear.

Do I need trekking poles?

They are optional, but many trekkers find them useful, especially on steep descents and uneven terrain.

What should I carry in my daypack?

Keep water, snacks, rain protection, warm layers, sunglasses, sunscreen, medication, documents, electronics and other essential items you may need during the day.

Is the Annapurna Circuit cold?

Temperatures vary significantly depending on altitude, season and time of day. Lower sections can be relatively warm while the high-altitude sections around Thorong La can be very cold.

What is the most important thing to remember when packing?

Pack according to the highest and coldest part of your itinerary, not only the conditions you expect at the beginning of the trek.

Pack Smart. Trek Confidently.

The Annapurna Circuit is one of Nepal’s most varied trekking journeys, taking you through changing landscapes, mountain villages, high-altitude terrain and the dramatic Thorong La Pass.

You do not need the biggest backpack or the most expensive equipment.

You need the right equipment for your route, season and altitude.

At Ambition Himalaya, our trekking team can help you understand what you actually need before starting your Annapurna Circuit adventure. From itinerary planning and trekking preparation to experienced local guides and logistical support, we aim to make your Himalayan journey organized and comfortable.

Planning your Annapurna Circuit Trek in 2026?

Explore the Annapurna Circuit Trek with Ambition Himalaya and speak with our team about your preferred itinerary, season and trekking requirements.

Ambition Himalaya – Your Local Partner for Himalayan Adventures in Nepal.

Mera Peak Climbing 17 Days: Complete Itinerary & Summit Guide

Mera Peak Climbing 17 DaysMera Peak Climbing – 17 Days: A Complete Journey to Nepal’s High Himalayan Summit

Standing at 6,476 metres (21,246 ft), Mera Peak is one of the most rewarding high-altitude climbing adventures in Nepal. The journey combines remote Himalayan trails, quiet mountain villages, long trekking days and a genuine summit experience in the high mountains.

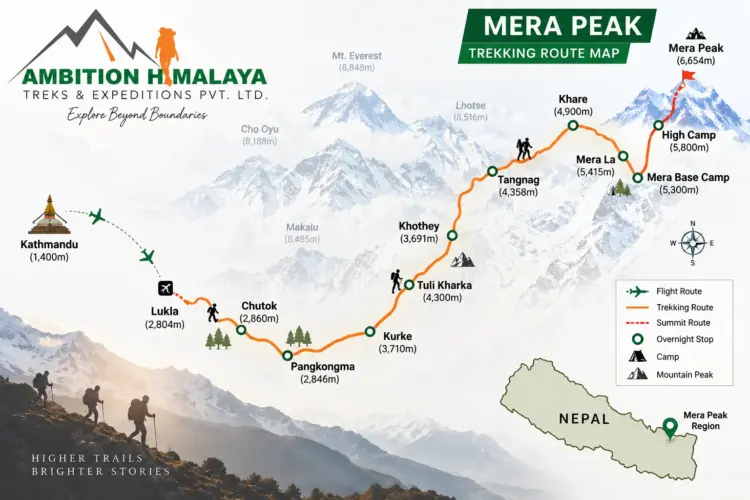
The 17-day Mera Peak Climbing itinerary by Ambition Himalaya is designed for travellers who want more than a conventional trek. The route begins in Kathmandu, flies towards Lukla and gradually enters the remote Hinku Valley before reaching Khare and Mera High Camp. The summit attempt is made early in the morning, followed by the return journey through the mountain trails to Lukla and finally Kathmandu.

Mera Peak is part of Nepal’s trekking-peak climbing environment, where appropriate climbing skills, equipment, permits and experienced mountain support are important. Nepal Tourism Board notes that Nepal’s trekking peaks require climbing skills and proper climbing equipment and should not be underestimated simply because they are classified as trekking peaks.

For travellers looking for a challenging but achievable Himalayan climbing experience, Mera Peak Climbing offers an impressive combination of adventure, altitude, mountain scenery and cultural experience.

Mera Peak Climbing at a Glance

                                Mera Peak Climbing at a Glance

Trip Detail Information
Trip Name Mera Peak Climbing
Duration 17 Days
Maximum Elevation 6,476m / 21,246ft
Starting Point Kathmandu
Trekking Start Lukla
Summit Mera Peak
Main Valley Hinku Valley
Highest Camp Mera High Camp
Summit Day Day 10
Difficulty Challenging high-altitude climb
Accommodation Hotels and mountain lodges/teahouses
Best Seasons Spring and autumn are generally preferred
Company Ambition Himalaya

Official trip page: Mera Peak Climbing – Ambition Himalaya

Why Choose Mera Peak Climbing

Why Choose Mera Peak Climbing?

Mera Peak offers a very different experience from simply trekking to a Himalayan viewpoint. You spend several days walking through changing landscapes before entering the higher alpine environment, where the character of the journey changes completely.

The lower part of the route takes you through forests and traditional mountain trails. As you gain altitude, the vegetation becomes thinner, the landscape becomes more rugged and the surrounding mountains become increasingly dominant.

Eventually, the trail reaches Khare, where the focus shifts from trekking to climbing preparation.

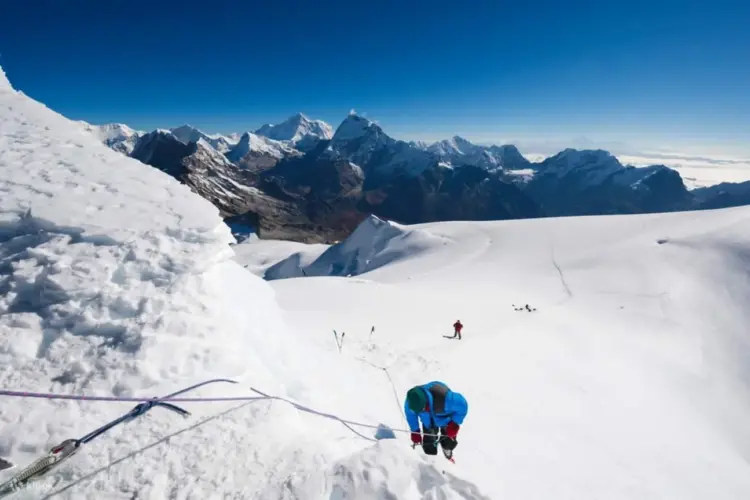
The summit day is the defining moment of the journey. An early start allows climbers to make progress during the colder and generally more stable morning hours before returning to lower elevations.

From the summit, the Himalayan panorama is one of the great rewards of the climb, with views across the high peaks of the Khumbu and surrounding Himalayan ranges.

Mera Peak Map

Mera Peak Climbing 17 Days – Complete Day-to-Day Itinerary

Day 1: Arrival in Kathmandu – Transfer to Hotel

Your Mera Peak adventure begins with your arrival in Kathmandu, Nepal’s vibrant capital city.

After completing the airport formalities, you will be transferred to your hotel. This first day is intentionally kept relaxed, allowing you to recover from your journey and settle into the Himalayan atmosphere.

Kathmandu is a fascinating mixture of ancient culture and modern city life. Depending on your arrival time, you may have an opportunity to explore the surrounding streets, enjoy traditional Nepali food or simply rest before the trekking and climbing journey begins.

Overnight: Kathmandu
Altitude: 1,300m

Day 2: Kathmandu – Trek and Climb Preparation

Day two is dedicated to preparation.

There is time to review your trekking and climbing equipment, organize your bags and complete the necessary preparations for the journey into the Everest region.

This is also an important opportunity to make sure that your clothing, footwear, climbing equipment and personal essentials are suitable for the changing conditions you will encounter.

For a high-altitude trip like Mera Peak, preparation is not something to leave until the last moment. Your guide and climbing team can help identify equipment requirements and make sure everything needed for the higher sections of the route is ready.

You may also have free time to explore Kathmandu or purchase any last-minute trekking supplies.

Overnight: Kathmandu

Day 3: Fly from Kathmandu to Lukla and Trek to Chhutanga

The adventure properly begins with an early flight towards Lukla.

The flight takes approximately 30 minutes, followed by the beginning of the trek towards Chhutanga.

Nepal Tourism Board describes Lukla as one of the main gateways to the Everest region and notes that the flight from Kathmandu is approximately 30 minutes.

The first walking section introduces you to the Himalayan trail. After leaving Lukla, the surroundings gradually become quieter as you move away from the airport and settlements.

The walk to Chhutanga takes approximately 3–4 hours, depending on trail conditions and the pace of the group.

Walking: 3–4 hours
Flight: Approximately 30 minutes
Destination: Chhutanga

Day 4: Chhutanga to Tuli Kharka

Today the trail becomes more demanding.

The route from Chhutanga to Tuli Kharka, at approximately 4,100m, involves a substantial increase in elevation. This section of the journey is important because the body begins adjusting to the higher Himalayan environment.

The trail passes through mountain terrain with changing vegetation and impressive views as you gradually move deeper into the remote landscape.

The walking time is approximately 5–6 hours.

A steady pace is more valuable than trying to walk quickly. At this stage of the itinerary, conserving energy and allowing your body to adapt to altitude are important parts of the climb.

Trek: Chhutanga → Tuli Kharka
Altitude: Approximately 4,100m
Walking: 5–6 hours

Day 5: Tuli Kharka to Kothe

The journey continues towards Kothe.

Today’s trail takes approximately 6–7 hours, passing through the rugged landscape of the Hinku Valley region.

The scenery gradually changes as the route moves further into the mountains. The trail feels increasingly remote, and the surrounding peaks become a constant presence.

Kothe is an important stop on the Mera Peak route because it provides a chance to rest before the itinerary continues towards Thangnak and eventually Khare.

Trek: Tuli Kharka → Kothe
Altitude: Approximately 4,182m
Walking: 6–7 hours

Day 6: Kothe to Thangnak

After breakfast, the trek continues towards Thangnak, located at approximately 4,350m.

Compared with the previous day, the walking distance is shorter, with around 4–5 hours on the trail.

This is a beautiful section of the journey, with the surrounding mountain landscape becoming more dramatic as you gain altitude.

The slower pace is intentional. At these elevations, every additional metre of altitude has an effect on the body, and gradual acclimatization becomes increasingly important.

Trek: Kothe → Thangnak
Altitude: 4,350m
Walking: 4–5 hours

Day 7: Thangnak to Khare

Today’s destination is Khare, situated at approximately 5,045m.

The trek takes around 4–5 hours, but the altitude makes this section considerably more demanding than the number of walking hours might suggest.

Khare is an important location in the Mera Peak climbing itinerary because the journey now moves firmly into the high-altitude climbing phase.

The surrounding environment becomes increasingly alpine, with fewer trees and a much more exposed mountain landscape.

Once you reach Khare, rest becomes particularly important.

Trek: Thangnak → Khare
Altitude: 5,045m
Walking: 4–5 hours

Day 8: Rest Day at Khare – Climbing Training and Preparation

Day eight is one of the most important days of the entire itinerary.

Rather than continuing higher immediately, you spend the day at Khare.

This provides valuable time for acclimatization while also allowing the climbing team to prepare for the summit section.

Depending on the conditions and the needs of the group, the day can include:

  • Climbing technique practice
  • Equipment checks
  • Harness and climbing gear preparation
  • Crampon familiarization
  • Rope-system briefing
  • Summit-day planning
  • Weather discussion
  • Rest and acclimatization

The goal is not simply to stay busy. A successful high-altitude climb requires energy, preparation and patience.

The Nepal Tourism Board specifically emphasizes that trekking peaks require climbing skills and proper climbing equipment.

Overnight: Khare
Altitude: Approximately 5,045m
Purpose: Acclimatization and climbing preparation

Day 9: Khare to Mera High Camp

The next stage takes you from Khare towards Mera High Camp, at approximately 5,780m.

This is a relatively short day in terms of hours, with approximately 4–5 hours of walking, but the altitude makes it physically demanding.

As you move towards High Camp, the surroundings become increasingly stark and exposed. The mountain environment feels very different from the lower trekking sections.

The goal is to reach High Camp with enough time to eat, organize climbing equipment and rest before the summit attempt.

Tomorrow will be the biggest day of the expedition.

Trek: Khare → Mera High Camp
Altitude: 5,780m
Walking: 4–5 hours

Day 10: Mera Peak Summit and Return to Khare

The Summit Day

This is the most important day of the Mera Peak Climbing 17-day itinerary.

The summit attempt begins very early, usually before sunrise, depending on weather, route conditions and the climbing team’s plan.

From High Camp, climbers begin their ascent towards the summit of Mera Peak.

The higher you climb, the more demanding the environment becomes. Cold temperatures, reduced oxygen and the physical effort of climbing require concentration and a controlled pace.

The summit elevation is approximately:

Mera Peak – 6,476m / 21,246ft

Reaching the summit is a major achievement.

From the top, climbers can experience expansive Himalayan views across the surrounding high peaks. The summit experience is not simply about reaching a number on an altitude chart; it represents the result of many days of walking, acclimatization, preparation and determination.

After spending appropriate time at the summit, the team begins the descent towards Khare.

The complete summit day is approximately 8–9 hours, depending on weather, route conditions, group pace and time spent on the mountain.

Summit: Mera Peak
Elevation: 6,476m / 21,246ft
Total walking/climbing: Approximately 8–9 hours
Overnight: Khare

Day 11: Reserve Day for Mera Peak Climbing

Mountain weather does not follow a fixed timetable.

For that reason, a reserve day is included in the itinerary.

If poor weather, snowfall, wind or other mountain conditions prevent the summit attempt on the planned day, this reserve day can be used to provide another opportunity.

Having a contingency day is an important part of a responsible Himalayan climbing itinerary. It avoids forcing a summit attempt simply because of a fixed calendar.

The final decision regarding the summit attempt should always be based on mountain conditions and the judgment of the climbing team.

Purpose: Weather contingency / additional summit opportunity

Day 12: Khare to Kothe

After completing the climbing section, the return journey begins.

The route descends from Khare towards Kothe, following the mountain trails back into the Hinku Valley.

The approximately 5–6 hour walk provides a noticeable change in atmosphere. As you lose altitude, breathing becomes easier and the landscape gradually becomes greener.

The descent can still be physically demanding because tired legs and accumulated fatigue from summit day remain factors.

Trek: Khare → Kothe
Altitude: Approximately 4,182m
Walking: 5–6 hours

Day 13: Kothe to Chhatrebu

The journey continues towards Chhatrebu.

This section takes approximately 5–6 hours and continues the gradual descent through the Himalayan landscape.

After the demanding climbing section, the rhythm of the trek changes. There is no longer a summit to chase, allowing you to enjoy the surrounding scenery and reflect on the achievement of the previous days.

Trek: Kothe → Chhatrebu
Walking: 5–6 hours

Trail names can be written slightly differently on maps and local itineraries, so you may also see variations such as Chhtrebu or Chhatrebu.

Day 14: Chhatrebu to Lukla

The final trekking section takes you back towards Lukla.

The walk takes approximately 5–6 hours.

Reaching Lukla marks the end of the main trekking and climbing section of the adventure. After several days in remote mountain terrain, returning to the town provides an opportunity to rest before the flight back to Kathmandu.

Trek: Chhatrebu → Lukla
Walking: 5–6 hours
Destination: Lukla

Day 15: Fly from Lukla to Kathmandu

An early morning flight takes you from Lukla back to Kathmandu.

The flight takes approximately 30 minutes, subject to weather and operational conditions.

Flying back after completing the Mera Peak climb can feel surprisingly emotional. The landscape that took days to cross on foot disappears beneath the aircraft as you return towards Kathmandu.

Once in Kathmandu, the remainder of the day can be used for rest.

Flight: Lukla → Kathmandu
Duration: Approximately 30 minutes

Nepal Tourism Board confirms that the Everest region is accessible by air, with Lukla serving as a major air gateway.

Day 16: Free Day in Kathmandu

After the physical demands of the expedition, Day 16 is intentionally relaxed.

You can use this day to explore Kathmandu, purchase souvenirs or simply rest.

Depending on your interests, possible activities include:

  • Shopping for traditional Nepali products
  • Exploring local markets
  • Visiting historic temples and monuments
  • Enjoying Nepali cuisine
  • Relaxing at your hotel
  • Exploring the streets of Kathmandu

This free day also provides some flexibility in case the Lukla flight schedule has been affected by mountain weather.

Day 17: Departure from Kathmandu

Your 17-day Mera Peak Climbing adventure comes to an end.

Depending on your flight schedule, you will be transferred to the airport for your onward journey.

You leave Nepal carrying more than photographs. The experience includes days of trekking through remote Himalayan trails, acclimatization at high altitude, climbing preparation and the achievement of standing on a Himalayan summit.

Mera Peak Climbing Difficulty

Mera Peak Climbing Difficulty

Mera Peak should not be treated as an ordinary trekking destination.

Although it is classified within Nepal’s trekking-peak environment, the climb reaches 6,476m, where altitude, cold, weather and physical exertion can become serious challenges.

Nepal Tourism Board describes trekking peaks as mountains that require climbing skills and climbing equipment and specifically warns that they should not be taken lightly.

The difficulty is influenced by several factors:

Altitude

The biggest challenge for many climbers is altitude. The itinerary gradually moves from Kathmandu at around 1,300m to more than 5,000m before the summit.

Long Trekking Days

Several days involve approximately 5–7 hours of walking, while summit day can take around 8–9 hours.

Cold and Weather

Temperatures can fall significantly at higher elevations, particularly during the early-morning summit push.

Physical Endurance

You need enough stamina to walk for several consecutive days and still have the energy required for summit day.

Basic Mountaineering Skills

Climbers should understand the correct use of climbing equipment and follow the instructions of their climbing guide.

Best Time for Mera Peak Climbing

The main seasons generally considered favourable for high-altitude climbing in Nepal are spring and autumn.

Nepal Tourism Board identifies March–May and October–November among the favourable periods for the Everest region, while winter brings colder conditions and the summer/monsoon period can bring rain and more difficult mountain conditions.

Spring – March to May

Spring brings improving mountain conditions and is one of Nepal’s major mountaineering seasons.

The landscape can also be particularly attractive as vegetation at lower elevations begins to develop.

Autumn – September to November

Autumn generally offers excellent visibility and is another major period for Himalayan trekking and climbing.

For a high-altitude climb such as Mera Peak, the exact weather conditions should always be checked before departure.

Mera Peak Climbing Permits and Regulations

Climbing a Himalayan peak in Nepal involves more than simply booking a trekking package.

Mera Peak falls within Nepal’s trekking-peak system, and the relevant permits and regulations need to be handled through the appropriate authorities.

Nepal Tourism Board states that permits for smaller trekking peaks are issued through the Nepal Mountaineering Association (NMA), while larger expedition mountains fall under the relevant government authority.

The Nepal Tourism Board also identifies Mera Peak Trek among the Everest-region routes where trekkers are required to be accompanied by a licensed trekking guide and carry an agency-issued TIMS card under the revised TIMS provisions.

For protected areas, an appropriate entry permit is also required. The official Nepal Tourism Board information lists Sagarmatha National Park among Nepal’s protected areas and provides the applicable entrance-fee information.

Useful Official Government Resources

Nepal Tourism Board – Everest Region:
Official Everest Region information – Nepal Tourism Board

Nepal Tourism Board – Mountaineering:
Official Mountaineering information – Nepal Tourism Board

Nepal Tourism Board – TIMS Card:
Official TIMS information – Nepal Tourism Board

Nepal Tourism Board – Park Entry Fees:
Official National Park entry-fee information

Nepal Tourism Board – Mountaineering information:
Mountaineering in Nepal – Official Nepal Tourism Board

For the latest permit requirements and fees, it is better to verify the current official information before each departure because regulations and fees can change.

What Makes the 17-Day Mera Peak Route Special?

One of the strongest features of this itinerary is the gradual transition from city to mountain.

You don’t simply arrive at a high camp and start climbing.

Instead, the journey develops naturally:

Kathmandu → Lukla → Chhutanga → Tuli Kharka → Kothe → Thangnak → Khare → High Camp → Mera Peak Summit → Khare → Kothe → Chhatrebu → Lukla → Kathmandu

Each stage prepares you for the next.

The early trekking days allow you to settle into the rhythm of walking. The middle section takes you deeper into the Hinku Valley and higher into the mountains. Khare becomes the transition point between trekking and climbing, while High Camp prepares you for the summit attempt.

This gradual progression is one of the reasons the journey feels like a complete Himalayan expedition rather than simply a summit day.

Mera Peak Climbing Preparation

Good preparation can make a significant difference to your experience.

Physical Preparation

Before arriving in Nepal, focus on endurance rather than only maximum strength.

Useful preparation can include:

  • Long-distance walking
  • Hiking on uneven terrain
  • Stair climbing
  • Cardiovascular training
  • Leg-strength exercises
  • Core training
  • Carrying a moderate backpack during training hikes

The objective is to become comfortable moving for several hours at a time.

Mental Preparation

High-altitude climbing is also a mental challenge.

Some days may feel slow. Weather can change. The summit may take longer than expected. Being patient and following the advice of your guide is essential.

Equipment Preparation

Your final equipment list should be confirmed with Ambition Himalaya before departure because requirements can vary according to season and climbing conditions.

Typical high-altitude equipment can include:

  • Mountaineering boots
  • Crampons
  • Harness
  • Helmet
  • Ice axe
  • Climbing rope equipment as required
  • Down jacket
  • Thermal layers
  • Gloves
  • Warm hat
  • Sunglasses/goggles
  • Headlamp
  • Trekking poles
  • Sleeping bag suitable for high altitude
  • Water bottles or hydration system
  • Sun protection
  • Personal medication and first-aid essentials

Altitude Awareness During Mera Peak Climbing

Altitude is one of the most important considerations on this journey.

The itinerary moves from approximately 1,300m in Kathmandu to 6,476m at the Mera Peak summit.

Because of this significant elevation gain, climbers should pay attention to how they feel throughout the journey.

Common altitude-related symptoms can include:

  • Headache
  • Reduced appetite
  • Tiredness
  • Difficulty sleeping
  • Shortness of breath
  • Nausea

Any concerning symptoms should be reported to the guide immediately. The appropriate response to serious altitude illness can include stopping the ascent and descending.

The mountain should never be treated as a race.

Mera Peak Summit Experience

There is a special feeling to reaching the summit after days of walking.

The early start, darkness, cold air and long climb eventually give way to the first light of the morning.

As the sun rises over the Himalayas, the landscape begins to reveal itself.

At approximately 6,476m, Mera Peak provides an extraordinary Himalayan viewpoint. The surrounding mountains stretch across the horizon, creating one of the most memorable moments of the entire expedition.

For many climbers, the summit is not just about the photograph.

It is the result of preparation, patience, physical effort and teamwork.

Responsible Travel in the Himalayas

A Mera Peak expedition takes place in a fragile mountain environment.

Travellers should make every effort to reduce their impact.

Simple practices include:

  • Carrying waste back where appropriate
  • Avoiding unnecessary plastic
  • Respecting local communities
  • Following designated trails
  • Respecting Buddhist cultural sites
  • Using water responsibly
  • Listening to local guides
  • Avoiding unnecessary disturbance to wildlife

Sagarmatha National Park is a protected Himalayan environment and is recognized by Nepal Tourism Board for its exceptional natural and cultural character.

Responsible travel helps ensure that the same mountain environment remains available to future trekkers and climbers.

Why Climb Mera Peak with Ambition Himalaya?

Ambition Himalaya focuses on Himalayan trekking and climbing experiences designed around the realities of travelling in Nepal’s mountain regions.

For a peak like Mera, good organization matters. The journey involves domestic flights, trekking logistics, acclimatization, climbing preparation, high-altitude support and a contingency plan for changing mountain conditions.

The 17-day itinerary gives travellers enough time to experience the route progressively instead of rushing directly towards the summit.

If you are planning your first Himalayan climbing experience or looking for a new challenge after completing high-altitude treks, Mera Peak can be a memorable next step.

Frequently Asked Questions About Mera Peak Climbing

How high is Mera Peak?

Mera Peak is approximately 6,476 metres (21,246 feet) high according to the elevation used for this itinerary.

How many days does Mera Peak Climbing take?

This Ambition Himalaya itinerary takes 17 days, including arrival and departure days, trekking, acclimatization, summit attempt and a reserve day.

Is Mera Peak suitable for beginners?

Mera Peak is not a normal beginner’s trek. It is a high-altitude climbing objective and requires appropriate preparation, equipment and professional mountain support. Previous high-altitude trekking experience is beneficial.

What is the highest point of the trip?

The highest point is the Mera Peak summit at approximately 6,476m / 21,246ft.

How long is summit day?

The itinerary estimates approximately 8–9 hours for the summit attempt and return to Khare, although actual timing depends on weather, route conditions, group pace and mountain conditions.

Is there a reserve day?

Yes. Day 11 is kept as a reserve day in case weather or other mountain conditions affect the planned summit attempt.

What is the best season for Mera Peak?

Spring and autumn are generally considered the preferred periods for Himalayan climbing. Nepal Tourism Board identifies March–May and October–November as favourable periods for the Everest region.

Do I need a climbing permit?

Yes. Mera Peak is part of Nepal’s trekking-peak climbing system, and the relevant climbing and trekking permissions must be arranged according to current Nepalese regulations. Nepal Tourism Board states that smaller trekking peaks are handled through the Nepal Mountaineering Association.

Do I need a guide?

For the Mera Peak route, current Nepal Tourism Board TIMS information lists Mera Peak Trek among Everest-region routes requiring a licensed trekking guide and agency-issued TIMS card.

Start Your Mera Peak Adventure with Ambition Himalaya

Mera Peak is more than a mountain summit. It is a journey through the quieter side of the Everest region, from the streets of Kathmandu to the airstrip at Lukla, through forested trails and remote valleys, towards the high alpine landscape surrounding Khare and Mera High Camp.

The 17-day Mera Peak Climbing itinerary provides a structured route with acclimatization, climbing preparation, a dedicated summit attempt and a reserve day for changing mountain conditions.

If you are ready to experience one of Nepal’s most memorable high-altitude climbing adventures, explore the full itinerary and contact Ambition Himalaya for current availability, inclusions, equipment requirements and booking information.

Plan Your Mera Peak Climbing Adventure

View the Mera Peak Climbing itinerary – Ambition Himalaya

Nepal Flood 2026: What Travelers and Trekkers Need to Know

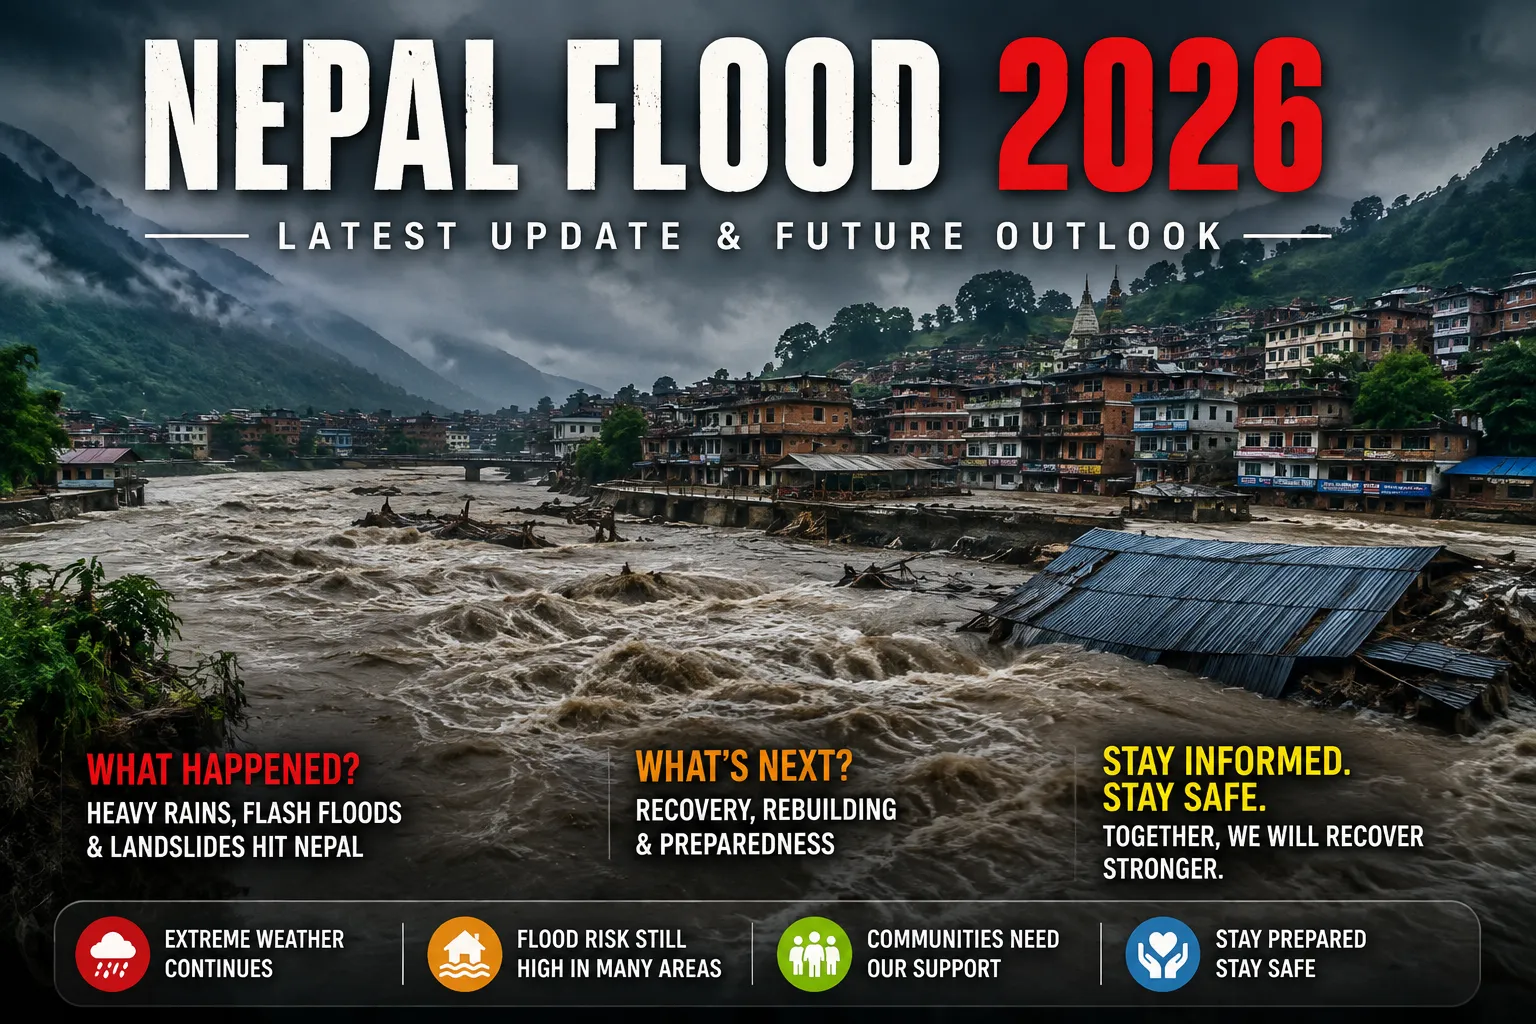
Nepal Flood 2026 Nepal has experienced a devastating flash flood in the Bhote Koshi River area following the events of August 26, 2026. The disaster has caused significant loss of life, damaged roads and bridges, and affected communities and travelers in parts of northern Nepal.
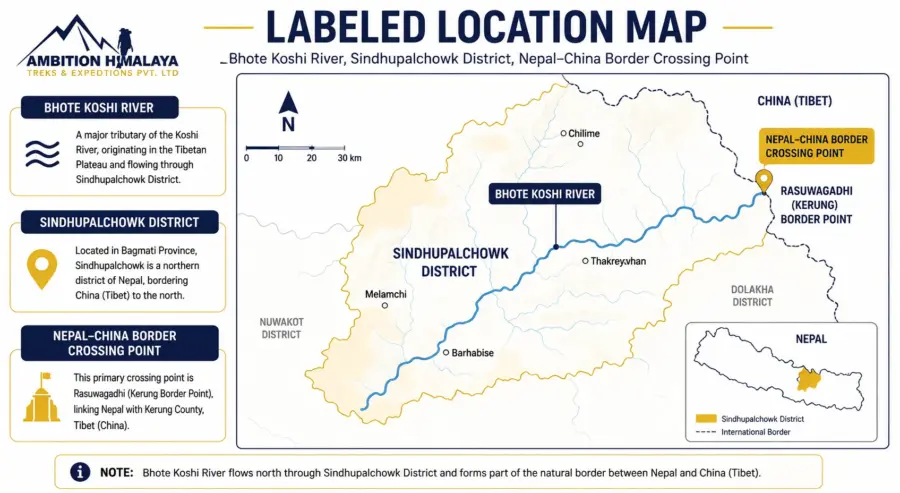
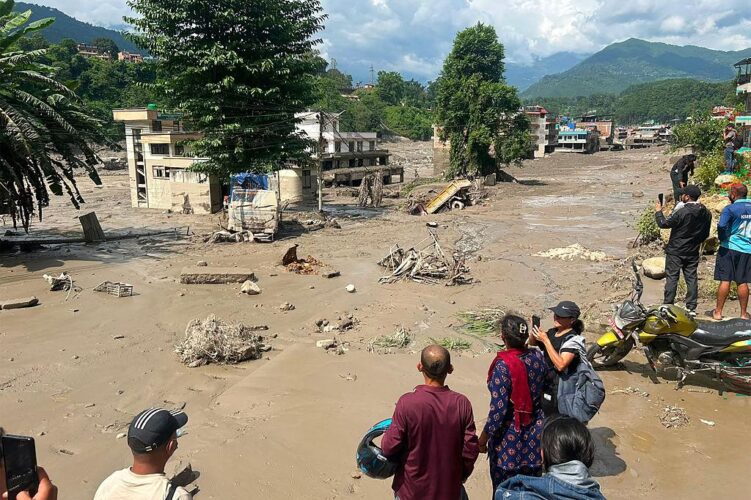
For people planning a trek or holiday in Nepal, the most important thing to understand is that the impact is concentrated in specific areas. Nepal as a whole remains open to international visitors, while authorities continue rescue, recovery, infrastructure assessment, and safety monitoring in the affected regions.

At Ambition Himalaya, we believe travelers should have clear and responsible information before making decisions about their journey. This guide explains what happened, which areas were affected, what travelers should know, and how to plan a Nepal trip safely.

What Happened in the Bhote Koshi River Area

What Happened in the Bhote Koshi River Area?

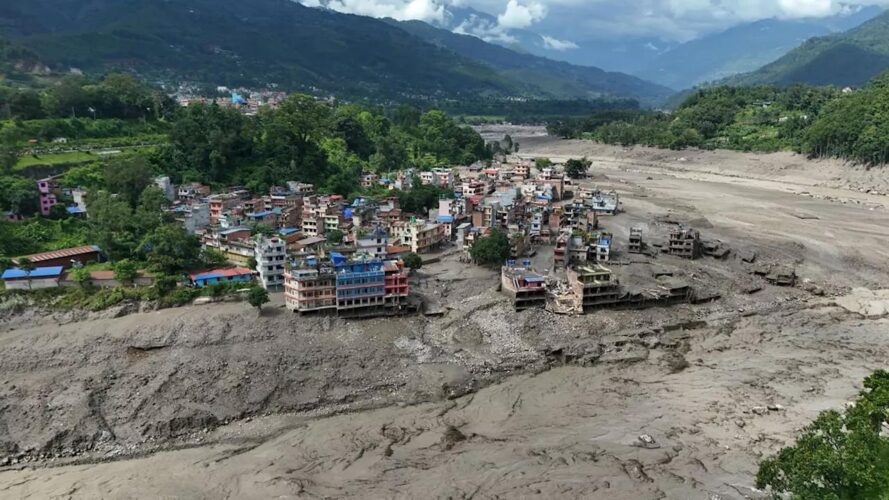
A severe flash flood struck the Bhote Koshi River area of Nepal on August 26, 2026. The flooding caused extensive damage across parts of the affected region, including houses, roads, bridges, hydropower infrastructure and other important facilities.

The sudden rise in water created extremely dangerous conditions for communities located close to the river system. Rescue teams, security personnel, local authorities and emergency services were mobilized to assist people in affected areas.

The exact scientific cause of the event is still being assessed. Initial reports have pointed toward a possible glacier- or slope-related event in the Himalayan region, rather than a conventional rainfall-driven flood.

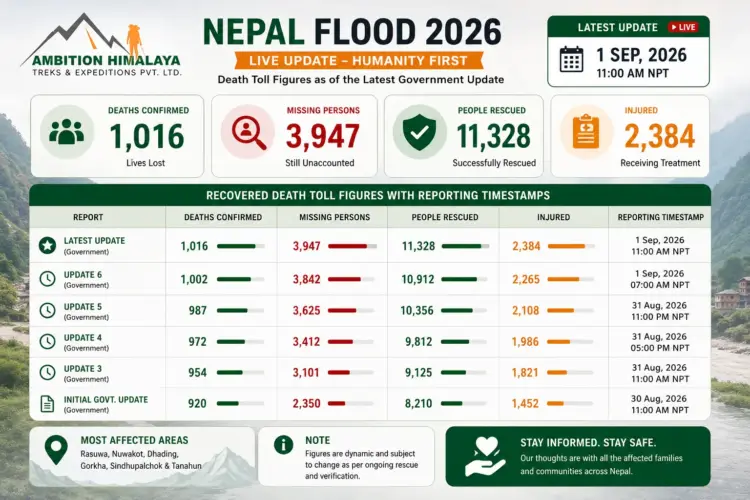
Because the situation developed rapidly, information and casualty figures have changed as rescue teams have reached areas that were initially difficult to access.

How Serious Was the Flood

How Serious Was the Flood?

The disaster has resulted in a major humanitarian emergency in the affected river corridor.

According to the Government of Nepal’s Ministry of Foreign Affairs update of August 28, 538 bodies had been recovered from the river areas, while many people were still missing. The government also reported extensive damage to infrastructure and continued search-and-rescue operations.

The authorities have emphasized that the situation is being continuously assessed and that information may change as recovery operations progress.

For travelers, this is an important reminder that Himalayan conditions can change quickly, particularly during the monsoon season and in areas close to major rivers and steep mountain terrain.

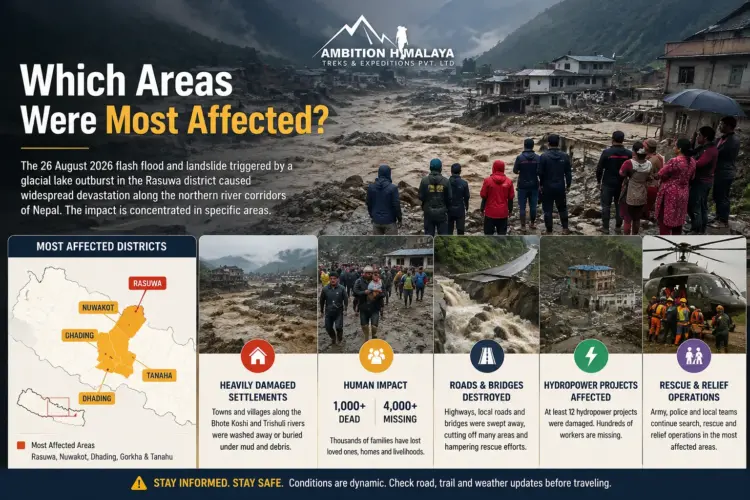
Which Areas Were Most Affected

Which Areas Were Most Affected?

The most serious impact has been reported around the Bhote Koshi River corridor and parts of Rasuwa, near Nepal’s northern border.

Infrastructure damage in the affected area has included:

  • Roads and highway sections
  • Bridges and river crossings
  • Houses and local settlements
  • Hydropower infrastructure
  • Border and transport facilities
  • Other essential community infrastructure

Some locations remain difficult to reach because roads and bridges were damaged.

Travelers who are planning to visit Rasuwa, Langtang or other destinations connected to the affected corridor should therefore check the latest local conditions before departure and work with an experienced local trekking company.

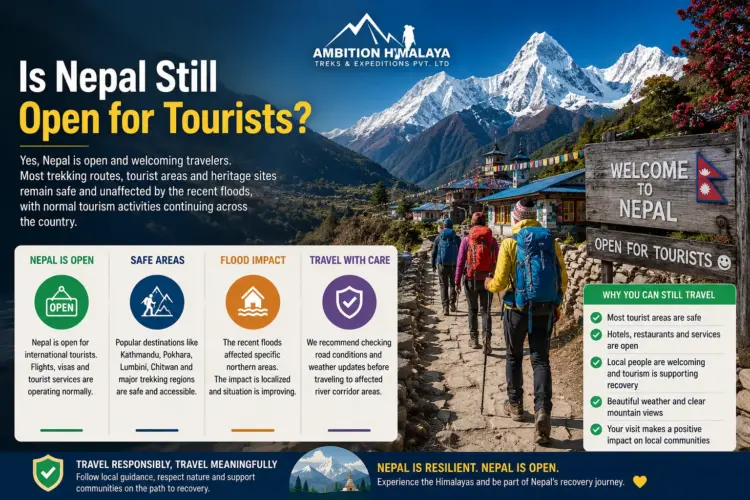
Is Nepal Still Open for Tourists

Is Nepal Still Open for Tourists?

Yes. Nepal remains open to international travelers.

The flood has affected specific areas rather than the entire country. Nepal’s Ministry of Foreign Affairs stated in its August 28 update that Nepal remained open for international travelers and tourists, while rescue and relief operations continued in the affected region.

This distinction is important.

Nepal is a large country with many independent trekking and tourism regions. A natural disaster affecting one river corridor does not automatically mean that every trekking destination in Nepal is closed.

However, travelers should always check the latest route conditions before starting a trek, particularly during the monsoon period.

Are Popular Treks Such as Everest Base Camp Affected?

The Bhote Koshi flood should not be interpreted as a nationwide closure of Nepal’s trekking routes.

Popular destinations such as Everest, Annapurna and other major trekking regions are geographically separate from the primary flood-affected corridor.

However, conditions can change quickly in the Himalayas. Road access, domestic flights, bridges, trails and weather conditions should always be checked shortly before departure.

For trekkers planning an Everest Base Camp Trek, Annapurna Trek, Manaslu Trek or another Himalayan journey, the safest approach is to confirm the current route condition with a registered local operator before travelling.

What About Langtang Trek?

Langtang requires particular attention because parts of the region are connected to the wider Rasuwa area.

This does not automatically mean that the Langtang Valley Trek is closed. Instead, travelers should check the condition of the specific access road, bridges and trekking route at the time of travel.

A responsible trekking operator should verify current conditions before confirming transportation and itinerary arrangements.

At Ambition Himalaya, we recommend that travelers planning Langtang or nearby routes contact us before departure so that the latest available information can be reviewed and the itinerary adjusted if necessary.

Why Can Floods Happen So Suddenly in the Himalayas?

The Himalayas are an extremely dynamic mountain environment.

High-altitude glaciers, steep slopes, unstable terrain, rivers and rapidly changing weather can combine to create sudden hazards. One of these hazards is a Glacial Lake Outburst Flood (GLOF).

A GLOF can occur when water stored behind a natural glacier- or moraine-dammed lake is suddenly released. A large volume of water and debris can then travel rapidly downstream through narrow mountain valleys.

However, it is important not to describe every Himalayan flood as a GLOF before scientific investigations are complete.

In the case of the August 2026 Bhote Koshi event, authorities and scientists have been investigating the precise trigger.

nepal flood

What Is the Government Doing?

Nepal’s government has mobilized multiple agencies for the emergency response.

The response includes:

Search and Rescue

Nepal’s security forces and emergency teams have been involved in searching affected areas and assisting people who are stranded or displaced.

Evacuation and Emergency Assistance

People in vulnerable locations have been evacuated where necessary, with emergency medical and humanitarian assistance being provided.

Infrastructure Assessment

Authorities are assessing damaged roads, bridges, hydropower facilities and other infrastructure needed to restore access.

Monitoring of River Systems

River conditions and downstream flood risks are being monitored because secondary hazards can occur after major flooding.

Assistance for Foreign Nationals

Nepal’s Ministry of Foreign Affairs has established an emergency response mechanism to assist foreign nationals affected by the disaster and to coordinate information with diplomatic missions.

Emergency Contact for Foreign Nationals

The Government of Nepal has established an Emergency Response Team for foreign nationals affected by the Bhote Koshi flood.

For urgent assistance concerning affected or missing foreign nationals:

Emergency Hotline / WhatsApp:
+977-9744441227
+977-9744441228

Available: 7:00 AM – 10:00 PM Nepal Time

Email:
[email protected]

The Ministry has also advised families and members of the public to rely on official information and avoid spreading unverified reports on social media.

Should You Cancel Your Nepal Trip?

Not necessarily.

The right decision depends on where you are travelling, when you are travelling and which route you will use.

If your itinerary is completely outside the affected region, the flood does not automatically mean that your Nepal holiday should be cancelled.

If your trip includes Rasuwa, Langtang or routes that depend on infrastructure in the affected corridor, your itinerary may require additional checking or modification.

Before travelling, consider:

  • Current road conditions
  • Trail and bridge status
  • Weather forecasts
  • Local authority notices
  • Domestic flight conditions
  • Trekking permits and access requirements
  • Advice from your local trekking operator

Avoid making decisions based solely on social media posts or old news articles.

What Should Trekkers Do Before Starting Their Journey?

A few simple precautions can make a significant difference.

1. Check the Latest Information

Conditions in the mountains can change quickly. Check current information shortly before departure.

2. Use a Registered Local Trekking Company

A local operator can monitor route conditions and communicate with guides, transport providers and local authorities.

3. Keep Your Itinerary Flexible

During periods of unstable weather or infrastructure disruption, a flexible itinerary can be much safer than a rigid schedule.

4. Take Travel Insurance

Travel insurance should provide appropriate coverage for trekking and emergency situations at the altitude and destination you are visiting.

5. Follow Your Guide’s Advice

Your guide is often the person with the most up-to-date information about trail conditions, weather and local risks.

6. Avoid Restricted Areas

Never attempt to cross damaged bridges, blocked roads or restricted sections simply because they appear passable.

Nepal Remains a Himalayan Destination Worth Exploring

Natural disasters are a serious part of life in mountain regions, but they should not define an entire country.

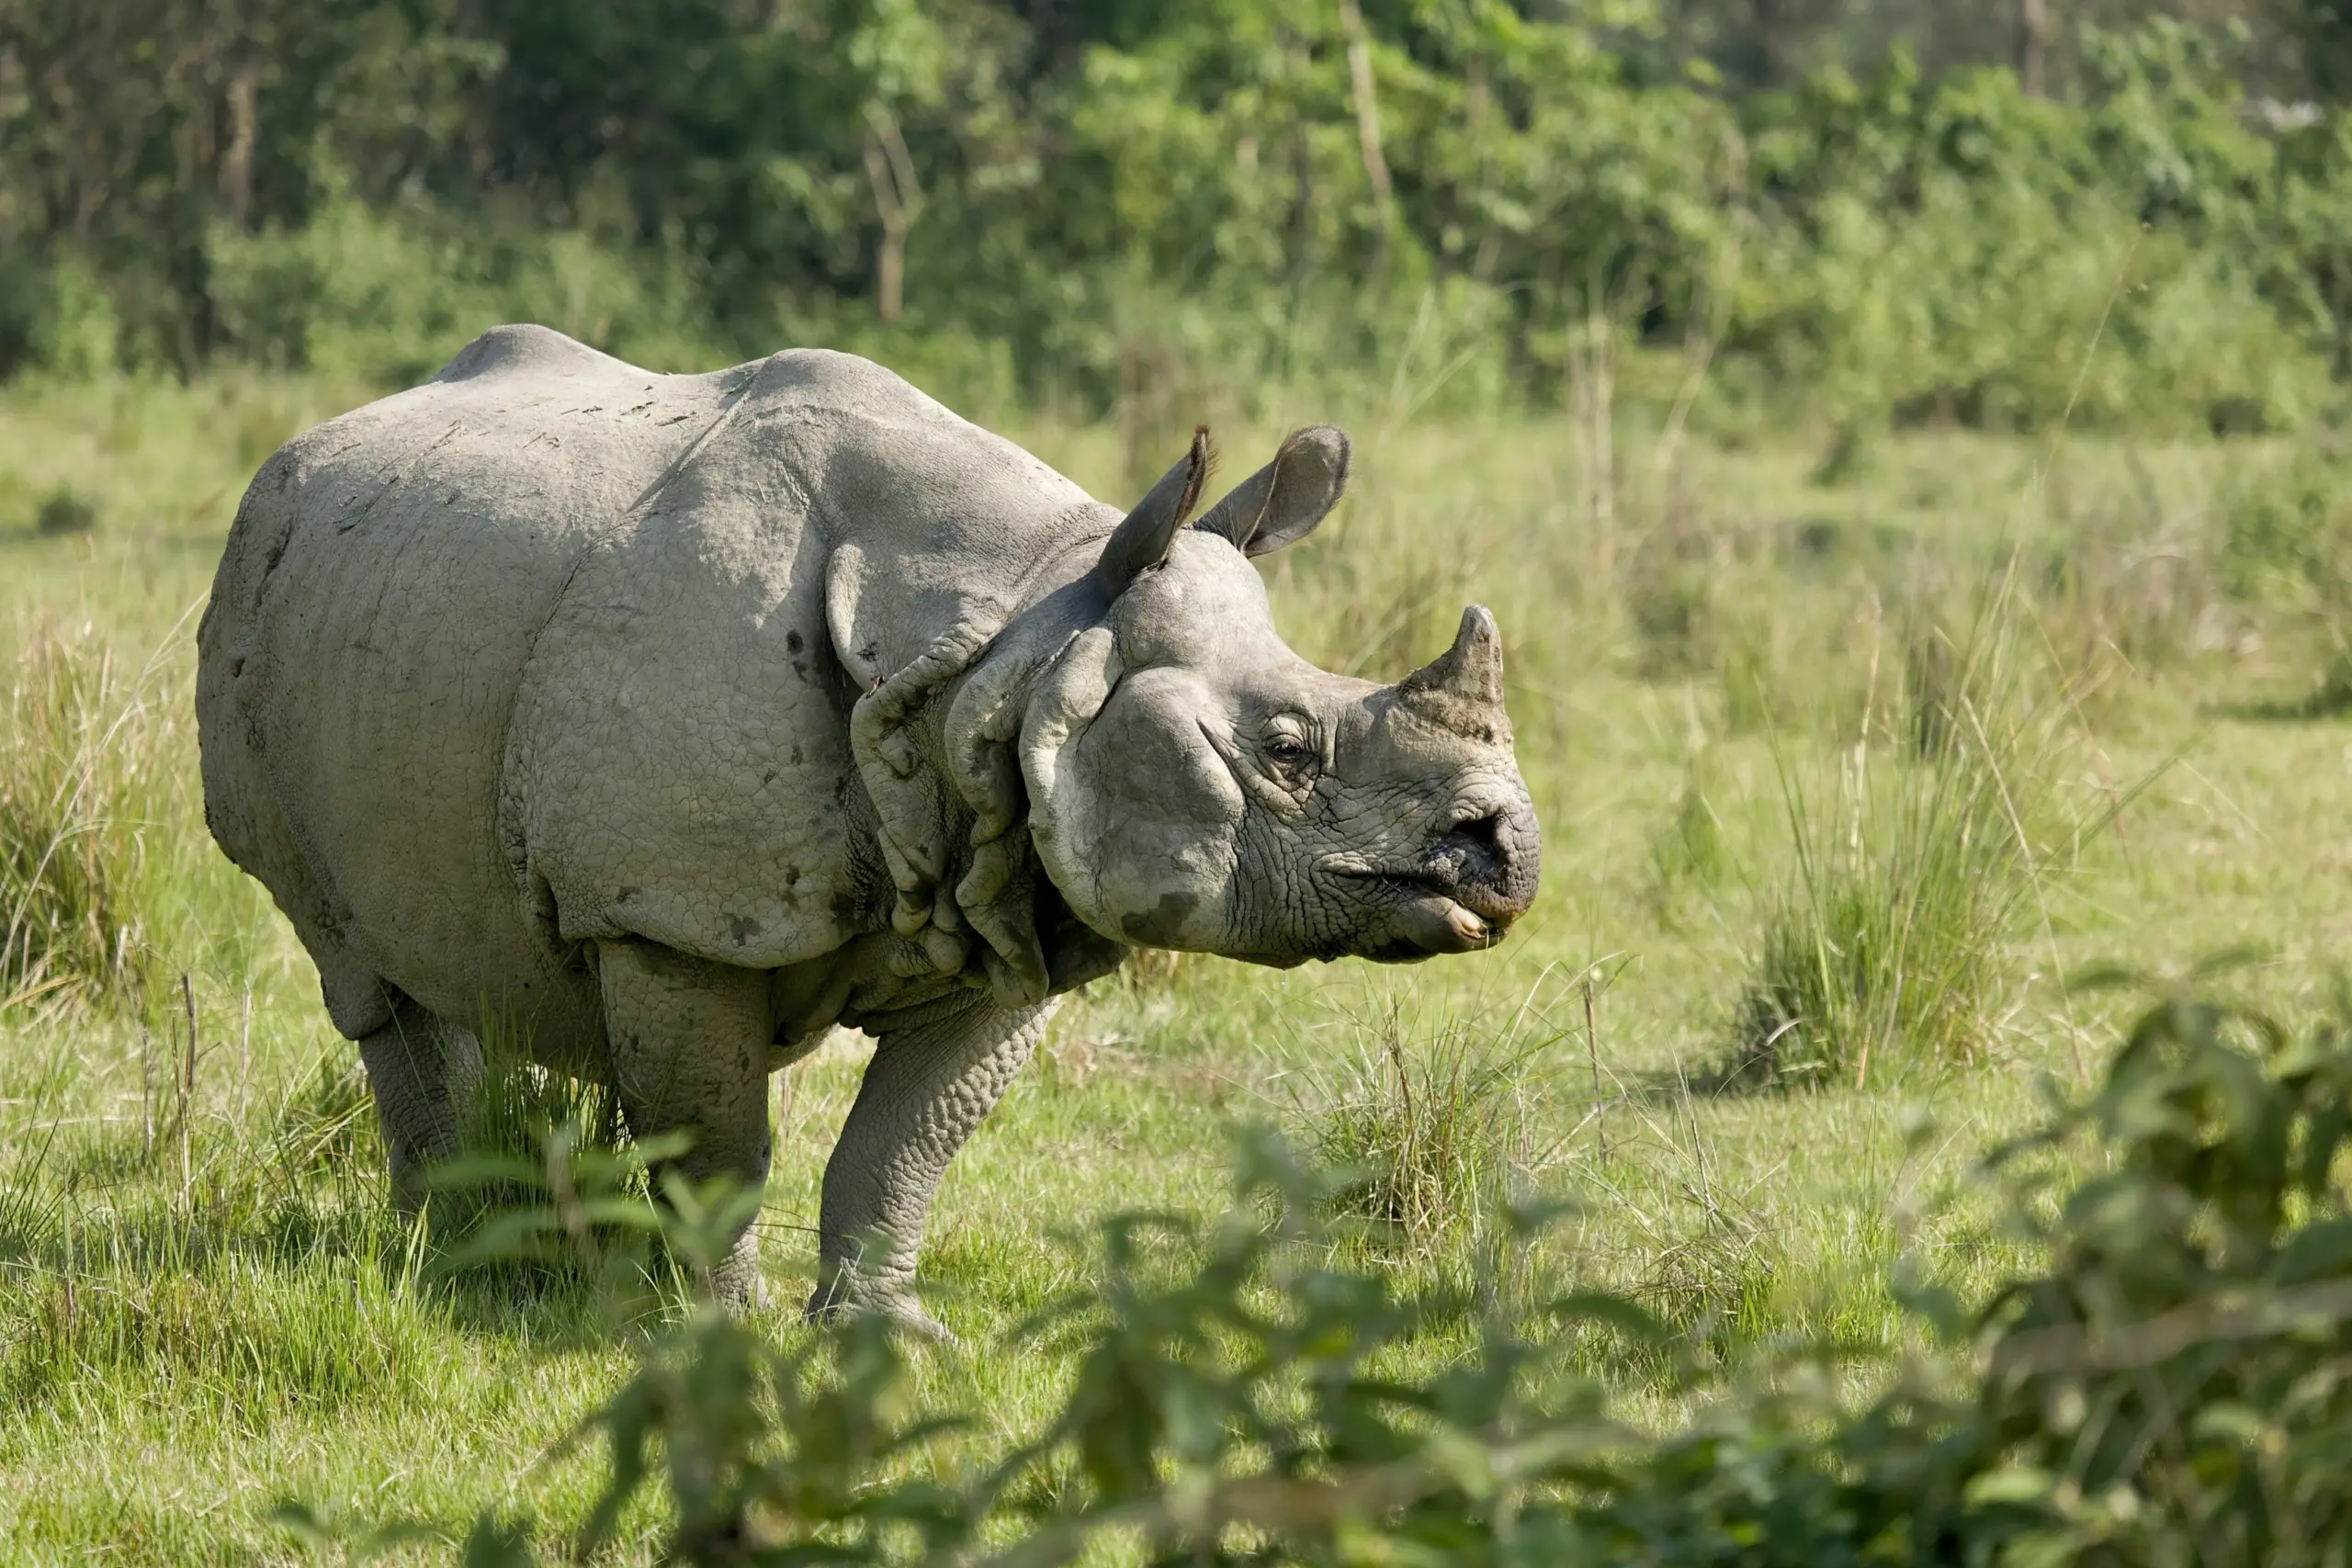
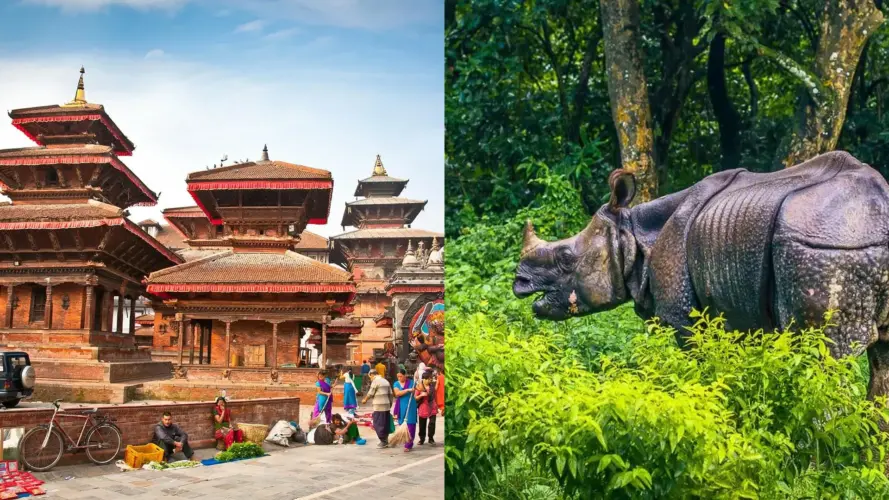
Nepal continues to welcome travelers who want to experience its mountains, culture, villages, wildlife and diverse landscapes. From the Everest region and Annapurna to cultural journeys around Kathmandu and wildlife experiences in the Terai, the country offers destinations far beyond the area affected by the Bhote Koshi disaster.

The key is responsible travel.

Choose the right route, check conditions before departure, listen to local advice and allow your trekking company to make adjustments when conditions require them.

Travel Nepal With Local Experience

At Ambition Himalaya Treks & Expeditions, we understand that planning a Himalayan journey requires more than simply booking a package.

Our team works with experienced local guides and support staff and provides trekking, tours, helicopter experiences, climbing and customized Himalayan adventures across Nepal and other Himalayan destinations.

We have been operating since 2009 and focus on creating well-organized journeys with experienced local teams, transparent arrangements and ongoing support throughout the trip.

If you are planning to visit Nepal in the coming weeks or months and are unsure whether your chosen route is operating normally, contact our team before making your final arrangements.

We can help you review your itinerary and, where necessary, consider an alternative route or destination.

Frequently Asked Questions

Is Nepal safe to visit after the 2026 flood?

Nepal remains open to international travelers. However, conditions vary by region, and travelers should check the latest information before visiting areas affected by the flood.

Is Everest Base Camp Trek open?

The Bhote Koshi flood does not mean that the entire Everest region is closed. Travelers should still confirm current transportation, weather and route conditions before departure.

Is Langtang Trek affected?

The Langtang region requires additional attention because of its proximity and access connections to Rasuwa. Check the latest local route and road conditions before travelling.

Was the flood caused by a glacial lake outburst?

A glacier- or slope-related event has been investigated as a possible trigger. The exact scientific cause should be confirmed through official assessments rather than assumed from preliminary reports.

Can foreigners get emergency assistance?

Yes. Nepal’s Ministry of Foreign Affairs has established an Emergency Response Team for foreign nationals affected by the disaster. The official emergency numbers are +977-9744441227 and +977-9744441228.

Should I book my Nepal trek now?

You can plan your trip, but if your itinerary passes through an affected or potentially disrupted area, confirm current route conditions with a trusted local operator before finalizing your travel arrangements.

The August 2026 Bhote Koshi flood has been a tragic event for Nepal, particularly for communities and travelers caught in the affected areas.

At the same time, it is important to understand the situation accurately. A serious disaster in one part of Nepal does not mean the entire country is closed or unsafe for travel.

For anyone planning a Himalayan adventure, the best approach is informed and responsible travel: stay updated, choose your route carefully, follow local guidance and travel with an experienced team.

Nepal is still waiting to welcome you to the Himalayas.

Information in this article is based on official Government of Nepal updates available at the time of publication. Because rescue operations and route conditions can change, travelers should verify the latest information before departure.

Manaslu Circuit Trek – 16 Days: A Journey Through Nepal’s Quiet Himalayan Wilderness

Manaslu Circuit Trek There are some Himalayan journeys where the mountains are the main attraction, and then there are journeys where the entire trail becomes part of the experience. The Manaslu Circuit Trek belongs to the second category.

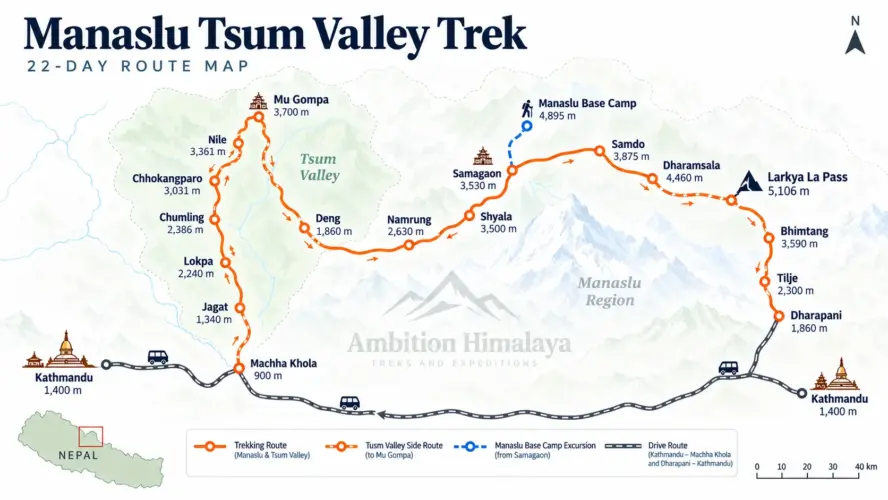
Over 16 days, the route moves from the busy streets of Kathmandu into increasingly remote valleys, following the Budhi Gandaki River through forests, waterfalls, traditional villages, Buddhist settlements and high mountain terrain before reaching the dramatic Larkya La Pass at 5,106 metres. The landscape changes almost every day, and so does the character of the trek.

For travellers who want something more intimate than Nepal’s busiest trekking routes, the Manaslu Circuit offers a compelling combination of mountain scenery, local culture and genuine Himalayan adventure. Mount Manaslu itself rises to 8,163 metres, making it the eighth-highest mountain in the world, and the circuit brings trekkers remarkably close to its surrounding peaks and valleys.

The 16-day itinerary offered by Ambition Himalaya is designed to combine the major highlights of the circuit with a sensible acclimatization day in Samagaon. The trip is available as either a private journey or a group departure, with group pricing becoming more attractive as the number of travellers increases.

Why the Manaslu Circuit Feels Different

Why the Manaslu Circuit Feels Different

The first thing many trekkers notice about Manaslu is how quickly the environment changes.

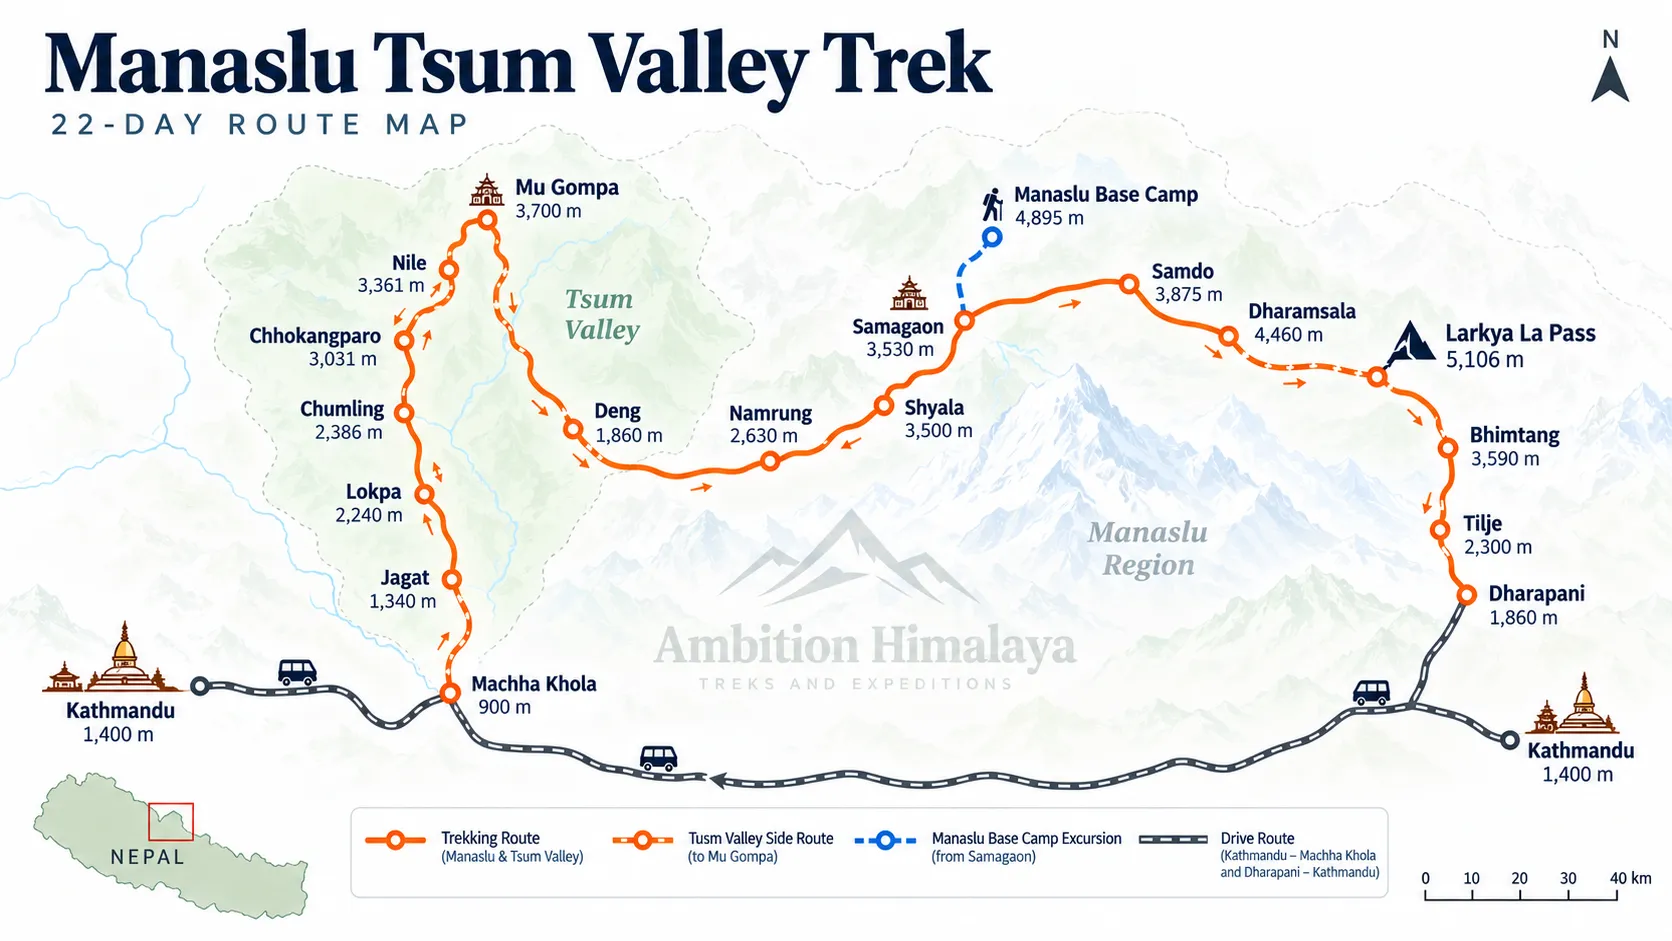
The journey does not begin among snow-covered peaks. It starts in Kathmandu and then heads towards Machha Khola, where the trail begins following the Budhi Gandaki River. From there, the valley gradually becomes narrower and more dramatic.

Villages such as Jagat, Deng, Namrung and Lho introduce trekkers to the everyday life of the mountain communities. Higher up, the architecture, landscape and atmosphere begin to show stronger Tibetan Buddhist influences. By the time the trail reaches Samagaon and Samdo, the feeling is completely different from the Nepal travellers experience in the lower valleys.

That gradual transition is one of the strongest aspects of the circuit. Instead of being surrounded by high mountains from the first morning, trekkers watch the Himalayas slowly become part of their everyday view.

The Nepal Tourism Board describes the Manaslu Conservation Area as a trekking destination where ancient trails, traditional culture and Himalayan scenery remain closely connected. The conservation area is also home to a wide range of wildlife and vegetation, including species such as snow leopard, musk deer and Himalayan tahr.

A 16-Day Route That Builds Naturally

A 16-Day Route That Builds Naturally

One reason the 16-day itinerary works well is the way the altitude increases gradually before the highest point of the trek.

Day 1 – Arrival in Kathmandu

The journey begins in Kathmandu at approximately 1,300 metres. After airport arrival, travellers are transferred to their hotel, generally giving them time to rest after the flight.

The evening can be kept relaxed. A walk around Thamel, a Nepali dinner or simply preparing for the days ahead is enough.

Day 2 – Kathmandu: Preparation and Free Day

The second day provides time to organize trekking equipment, meet the trekking team and make sure everything is ready before leaving Kathmandu.

It is also a useful opportunity to explore a little of the city. Travellers who have not previously visited Kathmandu can use the day to see some of its historic surroundings before beginning the trek.

Day 3 – Kathmandu to Machha Khola

The road journey towards Machha Khola marks the real beginning of the adventure.

The route passes through Arughat before reaching the Budhi Gandaki River and eventually Machha Khola at around 930 metres. It is a long driving day, but the scenery becomes increasingly rural as Kathmandu disappears behind you.

From this point onward, the character of the journey changes from road travel to trekking.

Day 4 – Machha Khola to Jagat

The trail follows the Budhi Gandaki River through forests and settlements.

The route passes Khorlabesi and the Tatopani area before continuing towards Jagat. Along the way, trekkers encounter suspension bridges, changing vegetation and the sound of the river cutting through the valley.

Jagat is an important settlement on the Manaslu trail and provides the first real sense that the trek is moving deeper into the mountains.

Day 5 – Jagat to Deng

The landscape becomes more rugged as the trail continues north.

After passing Philim, the route moves through forests, waterfalls and terraced agricultural areas. The trail eventually reaches Deng, where the surroundings begin to feel noticeably more alpine.

This is also where the influence of the local mountain communities becomes increasingly visible.

Day 6 – Deng to Namrung

The trek continues through Prok and other traditional settlements before reaching Namrung at approximately 2,900 metres.

The mountain scenery becomes more impressive here, with views opening towards peaks including Manaslu, Ganesh Himal and Annapurna II.

The change in elevation is noticeable, but the relatively gradual progression makes this section an important part of the acclimatization process.

Day 7 – Namrung to Lho Gham

This is a shorter trekking day compared with some of the later sections.

The trail climbs through pine forest and mountain settlements towards Lho Gham at approximately 3,180 metres. Lho is particularly memorable for its mountain views and Buddhist monastery.

From here, Mount Manaslu begins to feel much closer.

Day 8 – Lho Gham to Samagaon

The trail continues towards one of the most important villages on the circuit: Samagaon.

At around 3,550 metres, Samagaon sits in a spectacular mountain setting. The surrounding landscape includes views towards Manaslu, Himalchuli and other major peaks, while nearby Buddhist monasteries provide a glimpse into the spiritual traditions of the region.

The route also passes through settlements such as Shyala and Sama before reaching Samagaon.

Day 9 – Acclimatization in Samagaon

This is one of the most important days of the itinerary.

Rather than continuing directly to higher elevations, the schedule allows trekkers to spend a full day in Samagaon. The day can be used to explore the village and surrounding area, with options including a hike towards Pung Yen Monastery.

A proper acclimatization day is particularly valuable because the route becomes considerably higher after Samagaon.

Some trekkers may also be interested in a longer excursion towards Manaslu Base Camp, depending on conditions and the group’s schedule.

Day 10 – Samagaon to Samdo

The landscape becomes more open and increasingly barren as the trail climbs towards Samdo at approximately 3,690 metres.

The route follows the Budhi Gandaki and passes through high-altitude grazing areas. The surrounding terrain is very different from the green forests encountered during the first half of the trek.

Samdo is also close to the Tibetan border region and has a distinctive high-Himalayan atmosphere.

Day 11 – Samdo to Dharamsala

The distance is relatively short, but the altitude makes this section more demanding.

The trail passes through Larkya Bazaar and continues towards Dharamsala at around 4,450 metres. The surrounding landscape becomes increasingly stark, with glaciers, rocky slopes and high mountain terrain dominating the scenery.

Dharamsala is the final overnight stop before the biggest challenge of the circuit.

Day 12 – Crossing Larkya La Pass

This is the day many trekkers remember long after returning home.

The trail leaves Dharamsala early and climbs towards Larkya La Pass at 5,106 metres. It is the highest point of Ambition Himalaya’s 16-day Manaslu Circuit itinerary and the most physically demanding section of the trek.

The climb takes trekkers across high-altitude terrain before reaching the pass, where the surrounding Himalayan panorama opens dramatically.

After crossing Larkya La, the route descends towards Bhimtang at approximately 3,595 metres.

It is a long day, but it is also the defining moment of the entire circuit.

Day 13 – Bhimtang to Tilje

The landscape begins to transform again.

After the high-altitude environment around Larkya La, the trail gradually descends through forests and greener terrain. Rhododendron forests become more prominent, and the route passes grazing areas and traditional settlements before reaching Tilje.

The contrast between the previous day’s high pass and the lower, greener landscape is striking.

Day 14 – Tilje to Chyamje

The journey continues towards the lower valleys, passing through Dharapani and joining areas connected with the Annapurna region.

The trail follows the Marsyangdi River system and gradually loses altitude. Forests, villages and cultivated land replace the barren high-altitude landscape.

By the time trekkers reach Chyamje, the biggest mountain-pass challenge is behind them.

Day 15 – Chyamje to Besisahar and Kathmandu

The final road journey begins from Chyamje towards Besisahar and then Kathmandu.

The drive passes waterfalls, rivers and mountain villages before gradually returning to the more developed areas of Nepal.

After days in remote Himalayan valleys, arriving back in Kathmandu can feel surprisingly different.

Day 16 – Departure from Kathmandu

The final morning is reserved for departure.

Travellers can return home or choose to extend their Nepal stay with another destination, cultural experience or short adventure.

What Makes Larkya La Pass So Special

What Makes Larkya La Pass So Special?

Larkya La is not simply another viewpoint on the itinerary. It represents the transition between two very different sides of the Manaslu region.

The climb begins in the cold, dry landscape around Dharamsala and eventually reaches the pass at 5,106 metres. On a clear day, the surrounding mountain panorama is enormous, making the difficult climb feel worthwhile.

The important thing is not to treat Larkya La as a race.

The altitude, weather and terrain can change quickly, and the best approach is to maintain a steady pace, follow the guide’s advice and allow enough time for the crossing.

The 16-day Ambition Himalaya itinerary specifically places Dharamsala immediately before the pass and Bhimtang immediately after it, allowing the highest section of the trek to remain a dedicated part of the journey rather than being rushed into a longer sequence of unnecessary stops.

Culture Along the Manaslu Trail

The Manaslu Circuit is not only about mountains.

One of the most rewarding parts of the trek is seeing how life changes from village to village.

Lower sections of the trail feature Gurung communities, terraced fields, forests and traditional houses. Higher up, Buddhist monasteries, prayer flags, mani walls and Tibetan-influenced settlements become more common.

Samagaon and Samdo are particularly important cultural stops. The journey gives travellers the opportunity to experience mountain communities where tourism exists alongside traditional ways of life.

This is one reason having a knowledgeable local trekking team can add considerably to the experience. A mountain guide is not simply someone who walks ahead and points out the trail. A good guide can explain the meaning behind monasteries, local customs, village traditions and the changing landscape.

Permits and Responsible Trekking

The Manaslu region includes restricted areas, so travellers should make sure their permits and trekking arrangements are properly organized before starting the journey.

The Nepal Tourism Board states that the Manaslu Circuit is among the trekking routes where a licensed trekking guide and agency-issued TIMS card are required under the revised TIMS provisions.

The Nepal Tourism Board also lists the Gorkha Manaslu area as a restricted trekking area and provides the applicable restricted-area permit information.

For the most current permit rules, travellers should always check the official government sources before travelling because regulations and fees can change.

The Department of Immigration, Nepal currently publishes the trekking route and permit information for the Gorkha Manaslu area, including seasonal restricted-area permit rates.

When Is the Best Time for the Manaslu Circuit?

The two most popular trekking periods are generally spring and autumn.

Spring brings clearer mountain views, blooming rhododendrons and relatively stable trekking conditions. Autumn is popular for its clear skies, crisp mountain visibility and comfortable trekking conditions.

The Nepal Tourism Board lists March to May and September to November as the best seasons for the Manaslu Conservation Area.

Winter is much colder at high elevations, particularly around Dharamsala and Larkya La, while the monsoon season can bring rain, clouds and difficult trail conditions in lower sections.

That does not mean the mountains are completely off-limits outside the popular seasons, but the decision should be based on current weather, trail conditions and professional local advice.

How Much Does the Manaslu Circuit Trek Cost?

For travellers planning a private group, the group size can make a noticeable difference to the per-person price.

Ambition Himalaya currently lists the following group-discount structure for its 16-day Manaslu Circuit Trek:

Group Size Price Per Person
1 person US$1,450
2 people US$1,150
3–5 people US$1,100
6–9 people US$1,050
10–15 people US$1,000
16+ people US$950

The package page currently lists the trip from US$950, with group or private travel available. It also lists hotel, lodge and homestay accommodation options, trekking and hiking activities, and meals as part of the package information.

For friends, couples, families or larger private groups, this pricing structure can make organizing the trek together particularly attractive.

What Kind of Traveller Is This Trek For?

The Manaslu Circuit is best suited to people who enjoy walking for several consecutive days and are comfortable with changing conditions.

It is officially presented as a strenuous trek, and the itinerary reaches 5,106 metres.

You do not need to be an elite mountaineer, but preparation matters.

Regular walking, uphill training, cardiovascular exercise and some longer hikes before arriving in Nepal can make the experience much more enjoyable.

The most important quality on this trek is often patience. The mountains decide the pace. Weather can change, the trail can become demanding and high altitude requires respect.

A More Meaningful Way to Experience Manaslu

There is a temptation with Himalayan trekking to focus only on reaching the highest point.

But the Manaslu Circuit is better understood as a journey of gradual change.

You begin in Kathmandu.

Then there are roads, rivers and subtropical landscapes.

Then forests.

Then Gurung villages.

Then Buddhist monasteries and high mountain settlements.

Then the stark landscape around Samdo and Dharamsala.

Then Larkya La.

And finally, the descent into greener valleys.

That progression is what gives the Manaslu Circuit its personality.

It is not simply a trek to a viewpoint. It is a journey through several different Himalayan environments, connected by one long trail around an extraordinary mountain.

Planning the Manaslu Circuit with Ambition Himalaya

For travellers looking for a structured 16-day journey, Ambition Himalaya offers the Manaslu Circuit as both a group-joining and private trip. The itinerary includes the important acclimatization stop at Samagaon and the Larkya La crossing before descending towards Bhimtang and returning to Kathmandu.

The current itinerary and booking information can be checked directly here:

Manaslu Circuit Trek – 16 Days:
View the Manaslu Circuit Trek itinerary on Ambition Himalaya

Before booking, travellers should confirm the latest departure dates, inclusions, transportation arrangements, permit requirements and weather-related policies directly with the trekking company.

Official Nepal Government & Tourism Resources

For travellers researching the Manaslu Circuit independently, these official resources are useful:

Before You Set Out for Manaslu

The Manaslu Circuit is the kind of trek that stays with you in small details — the first morning beside the Budhi Gandaki, the stone villages above the valley, the prayer flags around Samagaon, the cold morning at Dharamsala, and finally the long climb towards Larkya La.

The 16-day route brings all of these experiences together without making the journey feel like it is only about reaching a high point. There are quiet village evenings, changing landscapes, mountain culture and long walking days, followed by the very different scenery of Bhimtang and the lower valleys.

If you are planning the Manaslu Circuit Trek – 16 Days and want to know more about the itinerary, group discounts, available departures, permits, transportation or what to expect on the trail, the Ambition Himalaya team can help you plan the journey according to your travel dates and group size.

For Manaslu Circuit Trek bookings and enquiries:

WhatsApp / Phone: +977 9851148898
Email: [email protected]

Ambition Himalaya
Your Manaslu journey starts with the right plan.

Everest Base Camp Trek in September: Weather, Cost, Crowds & Complete Guide

Everest Base Camp Trek in SeptemberThe Everest Base Camp Trek in September is a fascinating choice for trekkers who want to experience the Khumbu region just as Nepal’s monsoon season begins to fade. September is a transition month, which means conditions can change considerably from the beginning to the end of the month.

The first part of September can still bring rain, clouds and wet trails, particularly around Lukla, Phakding and Namche Bazaar. However, as the month progresses, the weather generally becomes more stable. By the final weeks of September, trekkers can enjoy clearer mountain views, greener valleys and fewer people on the trail compared with the busy October season.

For travelers who want a quieter Himalayan experience without completely moving away from the autumn trekking window, late September can be an excellent time for Everest Base Camp.

Everest Base Camp Trek in September at a Glance

Category September Conditions
Trek Duration 14 Days
Best Part of September Mid to Late September
Maximum Altitude 5,545m at Kala Patthar
Everest Base Camp Altitude 5,364m
Difficulty Moderate to Challenging
Weather Wet early, increasingly clear later
Mountain Views Variable early, much better late
Crowds Lower than October
Lukla Flights Possible delays during unstable weather
Best For Quiet trails, photographers and flexible trekkers

September should not simply be considered a “good” or “bad” month. The exact departure date makes a significant difference.

A trek beginning in the first week may feel quite different from one beginning after September 26.

Is September a Good Time for the Everest Base Camp Trek

Yes, September can be a good month for the Everest Base Camp Trek, particularly during the second half of the month.

The main reason is the transition from monsoon toward autumn. Early September can still have cloudy skies and occasional rainfall, while late September often brings much better visibility and drier trekking conditions.

Another advantage is that September generally sees fewer trekkers than October. If you prefer walking through the Himalayas without the busiest autumn crowds, September can offer a more peaceful atmosphere.

For the best balance between weather and quieter trails, late September is usually the more attractive option.

Everest Base Camp Weather in September

Weather is the biggest factor to consider when planning an EBC trek in September.

Early September

The first days of September can still feel like the tail end of the monsoon season.

You may experience:

  • Occasional rainfall
  • Cloudy mountain views
  • Wet and muddy trails
  • Humid conditions at lower elevations
  • Possible flight delays to Lukla
  • Slippery stone sections

The lower parts of the trail are generally more affected by rain than the higher areas.

Mid-September

Conditions usually begin to improve as September progresses.

Rain becomes less frequent, mornings can be clearer and the trail gradually starts drying. Mountain views may still disappear behind afternoon clouds, but there can be excellent periods of visibility.

Mid-September can therefore be a good compromise for trekkers who want fewer crowds but do not want to deal with the wettest part of the month.

Late September

The final part of September is generally the most attractive period.

Clearer mornings, cooler temperatures and better mountain visibility can make the journey particularly rewarding. The surrounding hills remain beautifully green after the monsoon, while the higher mountains begin to show their classic autumn appearance.

For many trekkers, the last 10 days of September provide the best September experience.

Temperature During the Everest Base Camp Trek in September

Temperature changes significantly as you gain altitude.

Location Approx. Day Temperature Approx. Night Temperature
Lukla 15–20°C 5–10°C
Namche Bazaar 10–16°C 0–5°C
Tengboche 8–13°C Around 0°C
Dingboche 5–12°C Below 0°C
Lobuche 2–8°C Around -5°C to -10°C
Gorak Shep 0–6°C Around -10°C or lower
Everest Base Camp Around 0–5°C Can fall well below freezing

These are approximate ranges rather than guaranteed daily temperatures. Weather in the high Himalayas can change quickly.

Trail Conditions in September

Trail conditions are another important consideration.

The lower Khumbu region can remain wet after weeks of monsoon rainfall. Sections between Lukla, Phakding and Namche Bazaar may be muddy, while stone steps and rocky sections can become slippery.

At the same time, September has one beautiful advantage: the landscape is exceptionally green.

Waterfalls are flowing strongly, forests are lush and the Dudh Koshi valley can look completely different from the dry landscape seen later in the season.

What Should Trekkers Expect?

  • Muddy sections at lower elevations
  • Wet stone steps
  • Strong-flowing streams and waterfalls
  • Green forests and valleys
  • Gradually drier trails toward late September
  • Possible cloud cover around mountain viewpoints

A good pair of waterproof trekking boots and proper rain protection can make a major difference.

Mountain Views During the September EBC Trek

Mountain visibility is one of the biggest questions travelers have about September.

The answer depends heavily on the date.

Early September can bring cloud cover that hides Everest, Ama Dablam, Lhotse and other peaks. However, clear windows can still appear, particularly in the morning.

By late September, visibility generally improves considerably.

The combination of recently washed mountain air and green landscapes can create beautiful photography conditions. Photographers may enjoy the contrast between deep green valleys and snow-covered Himalayan peaks.

Everest Base Camp Trek Crowds in September

Everest Base Camp Trek in September – 14 Days Detailed Itinerary

The 14-day Everest Base Camp Trek takes you from the vibrant streets of Kathmandu into the heart of the Khumbu Himalayas. The itinerary includes important acclimatization days at Namche Bazaar and Dingboche before reaching Everest Base Camp and Kala Patthar.

September can bring changing weather conditions, particularly during the first half of the month, so the daily schedule may be adjusted slightly according to flight conditions, trail conditions and the advice of the trekking team.

Day 01: Arrival in Kathmandu – Transfer to Hotel

Welcome to Kathmandu, the capital city of Nepal.

Our representative will meet you at Tribhuvan International Airport and transfer you to your hotel. After checking in, you can rest and relax or take a short walk around the nearby streets.

In the evening, your trekking guide will meet you at the hotel for a detailed briefing about the Everest Base Camp Trek. You will also enjoy a traditional welcome dinner at a local restaurant.

Since the next morning starts early, an early night is recommended.

Transportation: Private Car – approximately 30 minutes
Accommodation: 3-Star Hotel
Meals: Welcome Dinner
Altitude: 1,300 m / 4,264 ft

Day 02: Fly to Lukla and Trek to Phakding

Today marks the beginning of your Everest adventure.

After an early breakfast, you will head toward the airport for your flight to Lukla. During the busy spring and autumn trekking seasons, Lukla flights may operate from Ramechhap Airport depending on airport and flight arrangements. In that situation, you will travel by private vehicle to Ramechhap before taking the short flight to Lukla.

After landing at Lukla, you will have breakfast before beginning the first walk of the trek.

The trail descends gradually through Cheplung before continuing toward Ghat and eventually reaching Phakding. The relatively short walking day gives your body time to begin adapting to the increasing altitude.

Flight: Approximately 30 minutes
Walking: 3–4 hours
Accommodation: Lodge
Meals: Breakfast, Lunch & Dinner
Altitude: Lukla – 2,860 m / 9,383 ft

Day 03: Trek from Phakding to Namche Bazaar

After breakfast, you will follow the Dudh Koshi River through the beautiful Khumbu valley.

The trail passes through Benkar before reaching Monjo and Jorsalle. From here, you enter Sagarmatha National Park and continue toward the famous Namche Bazaar.

Several suspension bridges and uphill sections make this a more demanding day than the previous stage. As you approach Namche, you may catch your first views of Mount Everest and other Himalayan peaks depending on the weather.

Namche Bazaar is the major trading and cultural center of the Khumbu region and will be your home for the night.

Walking: 6–7 hours
Accommodation: Lodge
Meals: Breakfast, Lunch & Dinner
Altitude: 3,440 m / 11,286 ft

Day 04: Acclimatization Day in Namche Bazaar

Today is an important acclimatization day.

Rather than continuing higher, you will spend the day exploring Namche Bazaar and taking a short hike to a higher elevation before returning to the lodge.

One of the popular viewpoints is the Everest View Hotel, where you can enjoy impressive views of Mount Everest, Ama Dablam, Lhotse, Nuptse and surrounding peaks when the weather is clear.

You can also explore the Sagarmatha National Park Museum and learn more about the Sherpa people, Himalayan culture and the history of mountaineering in the Everest region.

The afternoon is free to explore Namche or simply rest.

Accommodation: Lodge
Meals: Breakfast, Lunch & Dinner
Altitude: 3,440 m / 11,286 ft

Day 05: Trek from Namche Bazaar to Tengboche

After breakfast, you will leave Namche Bazaar and follow a scenic trail overlooking the Himalayan valleys.

The route gradually descends before crossing the Imja Khola near Phungithanga. From here, the trail climbs through beautiful rhododendron and pine forests toward Tengboche.

Tengboche is famous for its historic monastery and spectacular mountain surroundings. On a clear September day, you can enjoy views of Everest, Lhotse, Nuptse, Thamserku and the striking Ama Dablam.

After exploring the monastery and surrounding area, you will spend the night at a local lodge.

Walking: 5–6 hours
Accommodation: Lodge
Meals: Breakfast, Lunch & Dinner
Altitude: 3,860 m / 12,664 ft

Day 06: Trek from Tengboche to Dingboche

Today the trail continues deeper into the high Himalayas.

You will descend toward Deboche before crossing the river and continuing toward Pangboche. The route passes traditional villages, Mani walls and beautiful alpine scenery.

As you gain altitude, the landscape gradually becomes more open and rugged. You will eventually arrive at Dingboche, a traditional high-altitude settlement surrounded by dramatic Himalayan peaks.

From Dingboche, you can enjoy views of Ama Dablam, Lhotse and Island Peak.

Walking: 5–6 hours
Accommodation: Lodge
Meals: Breakfast, Lunch & Dinner
Altitude: 4,410 m / 14,468 ft

Day 07: Acclimatization Day in Dingboche

Another important acclimatization day is scheduled at Dingboche.

After breakfast, you will take a gradual hike toward Nangkartshang Hill. The climb provides excellent views across the surrounding Himalayan landscape and is useful for helping your body adjust to the altitude.

From higher viewpoints, you may see impressive peaks including Makalu and Amphu Lapcha.

After enjoying the scenery, you will return to Dingboche and spend a relaxed afternoon at the lodge.

Accommodation: Lodge
Meals: Breakfast, Lunch & Dinner
Altitude: 4,410 m / 14,468 ft

Day 08: Trek from Dingboche to Lobuche

The journey continues toward the high-altitude settlement of Lobuche.

The trail begins with a scenic traverse through the Khumbu landscape, offering views of the surrounding valleys and peaks such as Cholatse.

You will reach Dughla and then continue toward the Thukla Pass. The pass contains memorials dedicated to climbers who lost their lives in the Himalayas, creating a quiet and reflective section of the journey.

From the pass, the trail continues through rugged terrain toward Lobuche, where you will spend the night.

Walking: 4–5 hours
Accommodation: Lodge
Meals: Breakfast, Lunch & Dinner
Altitude: 4,940 m / 16,207 ft

Day 09: Lobuche to Gorakshep – Everest Base Camp – Return to Gorakshep

Today is one of the biggest highlights of the entire Everest Base Camp Trek.

You will start early and walk toward Gorakshep through the high-altitude landscape of the Khumbu region. After reaching Gorakshep and taking a short break, you will continue toward Everest Base Camp.

The trail becomes increasingly rugged as you approach the base camp area. At Everest Base Camp, you can experience the atmosphere of the world’s highest mountain region and enjoy views toward the Khumbu Icefall, Nuptse, Pumori and Khumbutse.

After spending time at the base camp and taking photographs, you will return to Gorakshep for the night.

This is a long and demanding day, so maintaining a steady pace is important.

Walking: 8–9 hours
Accommodation: Lodge
Meals: Breakfast, Lunch & Dinner
Altitude: Gorakshep – 5,130 m / 16,830 ft
Everest Base Camp: 5,364 m / 17,598 ft

Day 10: Kala Patthar Sunrise – Descend to Pangboche

An early morning start takes you toward Kala Patthar, one of the most famous viewpoints in the Everest region.

With headlamps lighting the trail, you will climb gradually toward the viewpoint. Reaching approximately 5,545 meters, Kala Patthar offers one of the finest panoramic views of Mount Everest.

Sunrise over Everest, Nuptse, Pumori and Ama Dablam can be an unforgettable moment, particularly when the September sky is clear.

After enjoying the sunrise, you will descend toward Gorakshep before continuing down the valley. The trail eventually takes you toward Pangboche, where you will spend the night.

Walking: 9–10 hours
Accommodation: Lodge
Meals: Breakfast, Lunch & Dinner
Altitude: Kala Patthar – 5,545 m / 18,192 ft
Pangboche: 3,985 m / 13,074 ft

Day 11: Trek from Pangboche to Namche Bazaar

The return journey begins in earnest today.

After breakfast, you will retrace parts of the familiar trail through the Khumbu valley. The descent becomes easier as you move toward lower elevations and the air becomes warmer.

You will pass through beautiful forests of rhododendron and conifer before continuing toward Tengboche and eventually Namche Bazaar.

After several demanding days at high altitude, reaching Namche feels like a welcome return to a lively Himalayan town.

Walking: 6–7 hours
Accommodation: Lodge
Meals: Breakfast, Lunch & Dinner
Altitude: Namche Bazaar – 3,440 m / 11,286 ft

Day 12: Trek from Namche Bazaar to Lukla

Today is the final long walking day of the trek.

You will descend through the same beautiful Khumbu valley, crossing suspension bridges and following the Dudh Koshi River toward Phakding.

After lunch, the trail continues toward Lukla. Along the way, you can reflect on the journey from the lower valleys all the way to Everest Base Camp.

Once you reach Lukla, you can relax at the lodge and enjoy your final evening in the Everest region.

Walking: 6–7 hours
Accommodation: Lodge
Meals: Breakfast, Lunch & Dinner
Altitude: Lukla – 2,860 m / 9,383 ft

Day 13: Fly from Lukla to Kathmandu

After breakfast, you will head to the Lukla airport for your return flight to Kathmandu.

The flight takes approximately 30 minutes, although departure times can be affected by mountain weather and operational conditions.

After arriving in Kathmandu, you will transfer to your hotel and have the rest of the day to relax. You can enjoy a hot shower, explore the city, shop for souvenirs or simply recover after the trek.

Flight: Approximately 30 minutes
Accommodation: 3-Star Hotel
Meals: Breakfast
Altitude: Kathmandu – 1,300 m / 4,264 ft

Day 14: Final Departure from Nepal

Your Everest Base Camp adventure comes to an end today.

Depending on your flight schedule, you will have some free time in Kathmandu before our representative transfers you to Tribhuvan International Airport for your departure.

If you have additional time in Nepal, Ambition Himalaya can also help you arrange another trekking adventure, cultural tour, wildlife experience or sightseeing trip.

We hope your journey through the Everest region leaves you with unforgettable memories of the Himalayas.

Transportation: Private Car
Meals: Breakfast
Trip: Departure or optional extension

Everest Base Camp Trek Cost in September

September can offer good value compared with the busiest autumn period, although the exact cost depends on itinerary, group size, accommodation, transportation and inclusions.

Ambition Himalaya currently lists its 14-day Everest Base Camp Trek from US$1,130 per person, with lower per-person rates for larger private groups.

Private Group Discount

No. of People Price Per Person
1 Pax US$ 1450
2 Pax US$ 1320
3–5 Pax US$ 1280
6–9 Pax US$ 1230
10–15 Pax US$ 1180
16+ Pax US$ 1130

The final price should always be confirmed with Ambition Himalaya before booking because transportation, itinerary and seasonal arrangements can affect the total cost.

What to Pack for Everest Base Camp in September

What to Pack for Everest Base Camp in September

Because September can include both wet and cold conditions, packing should cover more than one type of weather.

Clothing

  • Moisture-wicking base layers
  • Fleece or warm mid-layer
  • Down jacket
  • Waterproof jacket
  • Waterproof trekking trousers
  • Warm trekking pants
  • Thermal underwear
  • Warm hat and gloves

Footwear

  • Waterproof trekking boots
  • Comfortable trekking socks
  • Spare socks
  • Lightweight camp shoes

Trekking Equipment

  • Trekking poles
  • Backpack
  • Sleeping bag suitable for cold temperatures
  • Headlamp
  • Water bottle
  • Sunglasses
  • Sunscreen
  • Backpack rain cover

Personal Essentials

  • Basic first-aid supplies
  • Personal medications
  • Water purification tablets or filtration system
  • Power bank
  • Camera
  • Passport and required documents

If you are trekking during the first half of September, proper rain protection should be treated as essential rather than optional.

Is Everest Base Camp Trek in September Difficult?

The Everest Base Camp Trek is a moderate to challenging high-altitude trek, regardless of the month.

September can add some extra difficulty during the early part of the month because of rain and slippery trails.

However, the biggest challenge remains altitude.

The trek reaches Everest Base Camp at 5,364m, while Kala Patthar reaches approximately 5,545m. Proper acclimatization and a sensible walking pace are therefore extremely important.

Do not rush simply because you want to complete the itinerary quickly.

How to Stay Safe During the September EBC Trek

A safe trek requires flexibility.

Follow a gradual itinerary

Acclimatization days at Namche Bazaar and Dingboche are important.

Watch the weather

Do not ignore heavy rain, poor visibility or unsafe trail conditions simply to stay on schedule.

Allow flight flexibility

Keep extra days available for possible Lukla flight disruptions.

Stay hydrated

Drink regularly throughout the trek, particularly as you move into higher elevations.

Listen to your body

Headache, dizziness, unusual tiredness or other altitude-related symptoms should not be ignored.

Trek with experienced support

A knowledgeable local trekking team can help monitor trail conditions, weather changes and altitude-related concerns.

September vs October: Which Is Better?

Both months have their own advantages.

Factor September October
Weather Improving throughout the month Generally more stable
Rain Possible early Usually much lower
Mountain Views Variable early, better late Usually excellent
Crowds Lower Higher
Accommodation More availability More demand
Landscape Very green Drier and clearer
Flights More weather-sensitive early Generally more reliable
Overall Quiet and flexible Classic peak-season experience

If your priority is reliable weather and consistently clear mountain views, October may be preferable.

If you want fewer crowds, greener scenery and a quieter experience, late September can be an excellent alternative.

Who Should Choose the Everest Base Camp Trek in September?

September can suit several types of trekkers.

First-Time Trekkers

Choose the second half of September if you are visiting Everest Base Camp for the first time and want a better balance between weather and crowds.

Photographers

Early September offers dramatic clouds and lush green landscapes, while late September can provide clearer Himalayan views.

Budget-Conscious Travelers

September can provide good value before the busiest autumn period begins.

Experienced Trekkers

Trekkers comfortable with changing weather may enjoy the quieter trails and changing landscapes throughout the month.

Private Groups

September is particularly attractive for friends, families and private groups who want more flexibility and can take advantage of group pricing.

Everest Base Camp Trek in September: Pros and Cons

Advantages

  • Fewer crowds than October
  • Beautiful green landscapes
  • Strong waterfalls and rivers
  • Better accommodation availability
  • Excellent late-month mountain visibility
  • Good option for private groups

Disadvantages

  • Rain is still possible early in September
  • Lower trails can be muddy
  • Lukla flights may face weather disruptions
  • Mountain views can be unpredictable early in the month
  • Conditions can change quickly

Final Verdict: Is September Worth It?

Yes, the Everest Base Camp Trek in September is worth considering, especially if you plan your departure carefully.

The first part of September requires more flexibility because of the remaining monsoon influence. But as the month moves toward its final weeks, the weather generally becomes more favorable, mountain views improve and the trail begins to take on the character of the autumn trekking season.

For trekkers who want a quieter experience than October without giving up the possibility of clear Himalayan views, late September is one of the most interesting windows to consider.

With the right preparation, suitable rain protection, enough acclimatization and some extra flexibility for Lukla flights, September can deliver a memorable journey through the Khumbu region.

Ready to plan your Everest adventure?
Explore the Everest Base Camp Trek – 14 Days with Ambition Himalaya and speak with our trekking team about the best September departure for your group.

Everest Base Camp Trek in September – FAQs

Is September a good month for Everest Base Camp?

Yes. The second half of September is generally more favorable because the monsoon influence begins to weaken and mountain visibility often improves.

Does it rain on Everest Base Camp Trek in September?

Rain is possible, particularly during the first part of September. The chance generally decreases as the month progresses.

Can I see Mount Everest in September?

Yes. Clear mountain views are possible throughout September, but late September generally offers more favorable visibility than the beginning of the month.

Is Everest Base Camp crowded in September?

September is generally less crowded than October, although the final week can become busier as the autumn trekking season starts gaining momentum.

Are Lukla flights reliable in September?

Lukla flights are weather-dependent. Early September can have a higher risk of delays because of clouds and rain, so keeping extra buffer days is recommended.

What temperature should I expect at Everest Base Camp in September?

Temperatures can vary significantly. Days can be relatively mild in direct sunlight, while nighttime temperatures at high elevations can fall well below freezing.

How many days does the Everest Base Camp Trek take?

A classic itinerary commonly takes around 14 days, including acclimatization and travel days. Ambition Himalaya currently offers a 14-day Everest Base Camp Trek.

What should I pack for September?

Bring waterproof trekking boots, rain protection, warm layers, a down jacket, trekking poles, a sleeping bag, gloves, a warm hat and other high-altitude essentials.

Is September suitable for first-time trekkers?

Yes, provided you are reasonably prepared for high-altitude trekking. For first-time trekkers, the later part of September is generally the more comfortable choice.

Can I do a private Everest Base Camp Trek in September?

Yes. Ambition Himalaya offers group-joining and private trip options, with per-person pricing becoming lower for larger private groups.

Ready to Trek to Everest Base Camp?

Your journey to the world’s most famous mountain is waiting.

If you are planning the Everest Base Camp Trek in September, Ambition Himalaya can help you organize the complete journey with experienced local guides, carefully planned acclimatization days, comfortable mountain accommodation and trekking support throughout the route.

Whether you are traveling solo, with friends, family or as a private group, our team can help you choose the right departure date and prepare for the changing September conditions.

Book Your Everest Base Camp Trek with Ambition Himalaya

Everest Base Camp Trek – 14 Days

  • Duration: 14 Days
  • Maximum Altitude: 5,545 m / 18,192 ft
  • Difficulty: Moderate to Challenging
  • Best Time: September to December
  • Trek Region: Everest / Khumbu Region
  • Starting Point: Kathmandu
  • Destination: Everest Base Camp

Why Trek with Ambition Himalaya?

Experienced Local Team
Trek with knowledgeable local guides who understand the Everest region, its trails and changing mountain conditions.

Carefully Planned Itinerary
The 14-day itinerary includes acclimatization days at Namche Bazaar and Dingboche to make the high-altitude journey more comfortable.

Private Group Options
Travel with your own friends or family and enjoy flexible arrangements based on your group size and preferences.

Complete Trekking Support
From Kathmandu to Lukla, Everest Base Camp and back, our team is there to support you throughout the journey.

Start Planning Your Everest Adventure

Don’t just dream about standing beneath Mount Everest—start planning your journey to the Khumbu Himalayas.

Book Everest Base Camp Trek – 14 Days →

For general trip information, availability and other Nepal trekking experiences:

Visit Ambition Himalaya →

Ambition Himalaya – Your Journey to the Himalayas Begins Here.


Before You Trek Upper Mustang: Permits, Fees & Entry Requirements

Upper Mustang

Upper Mustang is one of Nepal’s most fascinating Himalayan destinations, where ancient Tibetan-influenced culture, dramatic desert landscapes, centuries-old monasteries and hidden mountain settlements come together in a remarkably remote setting.

Unlike many popular trekking regions of Nepal, Upper Mustang is a restricted trekking area. That means travelers cannot simply arrive in Mustang and begin the trek independently. The journey requires specific permits and must be arranged through an authorized trekking agency.

If you are planning an Upper Mustang Trek, understanding the permit system in advance can save you time, prevent unnecessary complications and help you prepare the right documents before leaving Kathmandu.

In this guide, Ambition Himalaya explains the Upper Mustang trekking permit process, required documents, permit types, costs, application procedure, best seasons and other important information you should know before starting your journey.

Why Does Upper Mustang Require a Special Permit?

Upper Mustang lies in the northern part of Nepal, close to the Tibetan border. The region has a unique cultural and environmental character, including ancient villages, Buddhist monasteries, caves, traditional mud-brick architecture and a fragile high-altitude ecosystem.

Because of its location and cultural importance, access to Upper Mustang is regulated by the Government of Nepal.

The special permit system helps authorities:

  • Manage visitor numbers in the restricted region
  • Protect the traditional culture and heritage of Mustang
  • Support conservation of the Himalayan environment
  • Maintain records of trekkers entering the region
  • Improve safety and coordination in remote areas
  • Regulate travel near the international border

For this reason, obtaining the correct permits is an essential part of planning an Upper Mustang Trek.

What Permits Are Required for the Upper Mustang Trek

What Permits Are Required for the Upper Mustang Trek?

Depending on the current government regulations and your trekking itinerary, your trip generally involves the following permits and registrations:

1. Upper Mustang Restricted Area Permit

The Upper Mustang Restricted Area Permit is the most important authorization for entering the restricted section of Mustang.

This permit is issued under the regulations governing restricted areas of Nepal and is arranged through an authorized trekking agency.

The permit is connected to your trekking itinerary and the period for which you are authorized to remain in the restricted region. If your trekking duration changes, additional arrangements or fees may apply according to the prevailing government rules.

2. Annapurna Conservation Area Permit (ACAP)

The Upper Mustang trekking route passes through the Annapurna Conservation Area, so trekkers also need the applicable conservation-area permit.

The ACAP system contributes to the protection and management of the region’s natural environment, wildlife and trekking infrastructure.

Your journey can take you through landscapes that change dramatically from green valleys and river corridors to dry, wind-carved cliffs and high-altitude desert terrain.

3. TIMS Card

The Trekkers’ Information Management System (TIMS) registration is another important part of trekking administration in Nepal.

TIMS helps maintain trekking records and provides authorities with information about trekkers and their itineraries. This becomes particularly important in remote Himalayan areas where access to emergency assistance can be difficult.

Important: Permit requirements and fees can change when Nepal’s authorities update trekking regulations. Ambition Himalaya can confirm the applicable requirements for your nationality and travel dates before your trek begins.

Who Can Arrange the Upper Mustang Permit?

Upper Mustang is not a normal unrestricted trekking destination.

Foreign travelers generally need to arrange the restricted-area permit through a government-authorized trekking agency, rather than applying independently at a regular immigration counter.

At Ambition Himalaya, our team can coordinate the required trekking documentation and permit arrangements before you enter the restricted region.

This means you can concentrate on preparing for the trek instead of dealing with complicated administrative procedures in Kathmandu.

What Documents Are Needed?

To process the required permits, trekkers should normally prepare the following:

  • Valid passport
  • Valid Nepal visa
  • Passport-size photographs or digital photographs, where required
  • Confirmed trekking itinerary
  • Trekking agency and guide details
  • Other documents requested under current government regulations

Your passport information must match the details submitted for the permit application. It is therefore important to provide accurate information before the application is processed.

How Does the Upper Mustang Permit Process Work?

The process is much easier when handled by an experienced trekking agency.

Step 1: Choose Your Trekking Itinerary

First, decide your Upper Mustang itinerary, including your starting point, major overnight stops and total number of trekking days.

A well-planned itinerary also helps determine the appropriate permit period.

Step 2: Provide Your Documents

Send your passport details and the other required information to your trekking agency.

The agency checks the documents and prepares the necessary applications.

Step 3: Permit Application

The authorized trekking company submits the relevant paperwork to the appropriate government authorities in Kathmandu.

The Upper Mustang restricted-area authorization is processed according to the regulations applicable to your trek.

Step 4: Permit Confirmation

Once the application is approved and the required fees have been paid, the trekking agency receives the necessary permit documentation.

Step 5: Begin Your Trek

With your permits arranged, you can travel toward Mustang and begin the trekking itinerary with your authorized guide.

How Much Does the Upper Mustang Trek Permit Cost?

The cost of entering Upper Mustang depends on factors such as:

  • The nationality of the trekker
  • The number of days spent inside the restricted area
  • The applicable government fee structure
  • Current trekking regulations
  • Any additional days added to the original itinerary

The Upper Mustang Restricted Area Permit is generally the major permit expense, while other required registrations and conservation permits may be charged separately.

Because government fees can change, it is better not to rely on an old permit-price table found online.

Ambition Himalaya can provide the current applicable permit and trekking cost for your planned dates before you confirm your trip.

Can the Upper Mustang Permit Be Extended

Can the Upper Mustang Permit Be Extended?

If your trek takes longer than the period covered by your permit, you should not simply continue trekking without checking the applicable regulations.

Additional permit arrangements or fees may be required depending on the circumstances.

This is one reason why having a carefully prepared itinerary is important. Your trekking agency and guide can help you manage changes and communicate with the relevant authorities when necessary.

When Is the Best Time for Upper Mustang Trek?

One of the biggest advantages of Upper Mustang is its relatively dry climate compared with many other trekking regions of Nepal.

The region lies in the Himalayan rain shadow, which means it receives considerably less rainfall than areas south of the main Himalayan range.

Spring — March to May

Spring is an excellent period for trekking in Upper Mustang.

You can expect:

  • Generally favorable trekking conditions
  • Comfortable daytime temperatures at lower elevations
  • Clear mountain scenery on many days
  • Pleasant conditions for village and monastery exploration

Summer / Monsoon — June to August

Although monsoon brings heavy rainfall to many parts of Nepal, Upper Mustang remains comparatively dry because of its rain-shadow geography.

This makes Mustang one of the more interesting trekking destinations during Nepal’s monsoon season.

However, weather can still affect transportation, especially flights and road conditions around the lower Mustang region.

Autumn — September to November

Autumn is one of the most popular trekking seasons in Nepal.

The post-monsoon atmosphere can provide excellent visibility, comfortable trekking conditions and impressive Himalayan scenery.

Because demand is higher during this period, it is wise to arrange your trek and permits well in advance.

Winter — December to February

Winter transforms Upper Mustang into a much quieter destination.

Cold temperatures, snowfall and difficult high-altitude conditions can make trekking more challenging. Some services may also operate on a reduced basis during the coldest period.

Experienced trekkers who are properly equipped may still consider a winter journey, but careful planning is essential.

What Makes Upper Mustang Worth the Permit Process?

The permit is not simply an administrative requirement. It provides access to a region that feels dramatically different from many of Nepal’s better-known trekking destinations.

During the trek, you can experience:

Lo Manthang

The historic walled settlement of Lo Manthang is one of the defining highlights of Upper Mustang.

Its traditional architecture, monasteries, narrow lanes and Tibetan Buddhist heritage create an atmosphere unlike anywhere else in Nepal.

Ancient Monasteries

Upper Mustang contains numerous monasteries and religious sites that reflect centuries of Himalayan Buddhist traditions.

Exploring these places with respect for local customs provides a deeper understanding of the region.

Chhoser Caves

The caves around Chhoser are among Mustang’s most intriguing attractions.

Carved into steep cliffs, these ancient cave complexes demonstrate how people adapted to the harsh Himalayan environment over centuries.

Dramatic Himalayan Landscapes

The landscape changes dramatically as you travel deeper into Mustang.

Instead of the lush forests commonly associated with Himalayan trekking, you encounter:

  • Wind-shaped cliffs
  • Deep gorges
  • Dry river valleys
  • Colorful rock formations
  • High-altitude plateaus
  • Traditional mountain villages

Muktinath

Many Upper Mustang itineraries connect with the wider Mustang region and may include Muktinath, an important pilgrimage destination revered by both Hindus and Buddhists.

Its religious significance makes it one of the most memorable places to visit in the region.

Is Upper Mustang Trek Difficult?

Upper Mustang is generally considered a moderate to challenging Himalayan trek.

The difficulty does not come only from altitude. The terrain can include long walking days, steep ascents and descents, rocky trails and exposed sections.

Strong preparation is recommended.

Before the trek, focus on:

  • Cardiovascular fitness
  • Regular walking
  • Uphill training
  • Strength and endurance
  • Proper acclimatization
  • Hydration
  • Appropriate trekking equipment

You do not necessarily need to be an elite mountaineer, but you should be comfortable walking for several hours on consecutive days.

Do You Need a Guide for Upper Mustang?

Yes, travelers entering the restricted Upper Mustang region must follow the current government requirements regarding authorized trekking arrangements and guides.

A professional guide is valuable for more than permit compliance.

A knowledgeable local guide can also help with:

  • Route navigation
  • Altitude awareness
  • Local customs
  • Monastery etiquette
  • Accommodation arrangements
  • Communication with local communities
  • Emergency coordination
  • Changes in weather or trail conditions

For a remote destination such as Upper Mustang, experienced local support can make the journey considerably safer and more comfortable.

Travel Insurance for Upper Mustang

Travel insurance is strongly recommended for Himalayan trekking.

Your policy should ideally cover high-altitude trekking and emergency medical evacuation where applicable.

Before purchasing insurance, carefully check the altitude limit and whether helicopter evacuation is covered under the policy.

Do not assume that a standard travel insurance policy automatically covers high-altitude trekking.

What Should You Pack for Upper Mustang?

Your packing list should reflect the season and altitude.

Essential items generally include:

  • Good-quality trekking boots
  • Warm layers
  • Waterproof or windproof outer layer
  • Sleeping bag suitable for the season
  • Sunglasses
  • Sunscreen
  • Water bottle or hydration system
  • Personal medication
  • Basic first-aid supplies
  • Headlamp
  • Power bank
  • Trekking poles
  • Gloves and warm hat
  • Passport and permit-related documents

Because Upper Mustang can be extremely dry and windy, sun protection and hydration are particularly important.

Why Trek Upper Mustang with Ambition Himalaya?

A restricted-area trek requires more than simply booking a route.

At Ambition Himalaya, we focus on making the entire journey organized from the preparation stage to the final day of the trek.

Our team can assist with:

  • Trekking itinerary planning
  • Permit arrangements
  • Licensed trekking guides
  • Transportation coordination
  • Accommodation
  • Trekking logistics
  • Safety and acclimatization planning
  • Local cultural experiences
  • Emergency support and coordination

We believe that Upper Mustang should not be rushed. The best experience comes from having enough time to appreciate its landscapes, villages, monasteries and unique Himalayan culture.

Frequently Asked Questions

Do I need a special permit for Upper Mustang?

Yes. Upper Mustang is a restricted area, so travelers need the applicable restricted-area authorization in addition to other required trekking permits and registrations.

Can I trek Upper Mustang independently?

Foreign trekkers must follow the current government rules for restricted-area trekking, which require authorized trekking arrangements. An experienced trekking agency can handle the necessary permits and logistics.

How early should I arrange my Upper Mustang permit?

It is best to arrange your permits before traveling toward Mustang. During busy trekking periods, early preparation also helps ensure that your itinerary and logistics are properly organized.

Does the Upper Mustang permit price change by season?

The permit fee is determined by government regulations rather than simply by whether it is peak or off-season. However, other trekking expenses can vary depending on the season and availability of transportation and accommodation.

Is Upper Mustang suitable during the monsoon?

Yes. Upper Mustang lies in a rain-shadow area and is considerably drier than many other parts of Nepal during the monsoon. Nevertheless, weather and transportation conditions can still affect your journey.

How many days are needed for Upper Mustang?

The duration depends on the itinerary, transportation and places you want to visit. A well-planned Upper Mustang journey commonly takes around two weeks or more when travel, acclimatization and exploration days are included.

What is the main attraction of Upper Mustang?

Lo Manthang, ancient monasteries, traditional Tibetan-influenced villages, dramatic desert-like Himalayan landscapes and the mysterious cave settlements are among the region’s major attractions.

Can Ambition Himalaya arrange the Upper Mustang permits?

Yes. Ambition Himalaya can assist with the required trekking documentation and permit arrangements as part of your Upper Mustang trekking preparation.

Ready to Explore Upper Mustang?

Planning your journey to the hidden kingdom of Upper Mustang? Let Ambition Himalaya take care of your trekking permits, itinerary, transportation and local arrangements so you can focus on experiencing the extraordinary landscapes and culture of Mustang.

Whether you need help understanding the Upper Mustang Restricted Area Permit, want to customize your trekking itinerary, or simply have questions before booking, our experienced team is ready to assist.

Plan Your Upper Mustang Trek with Ambition Himalaya

Ambition Himalaya Treks & Expeditions
Thamel-26, Kathmandu, Nepal
Phone: +977 1 4518413
WhatsApp: +977 9851148898
Email: [email protected]

Explore the Upper Mustang Trek:
https://ambitionhimalaya.com/upper-mustang-trek/

Start planning your Himalayan adventure with Ambition Himalaya today.